Wildwood is located off of Highway 20 just before reaching the oceanside town of Fort Bragg, California when coming from Willits and Ukiah in the east. Northern California is known for its breath taking redwood trees and this campground is immersed deep within an old growth forest.
A word of caution: Highway 20 is VERY curvy coming from the east. As in, hairpin turns at 20 mph max around every corner. For the seasoned driver these can be tackled easily with a bit of patience and fínese but if you’ve got a large rig or are not 100% comfortable driving your RV yet, I would avoid coming in on highway 20.
After driving the windy mountain road pulling into the campground and meeting Jessica at the office was a welcomed relief – she greeted us with a warm smile & checked us in. Because the campground only requires a reservation deposit at booking, she processed the remainder of our campground fees and gave us a guide to the local area – “101 Things To Do in Mendocino County.” She gave some local recommendations includingprincess seafood market, Glass Beach, and the sea glass museum, she then radioed for Travis & Casey.
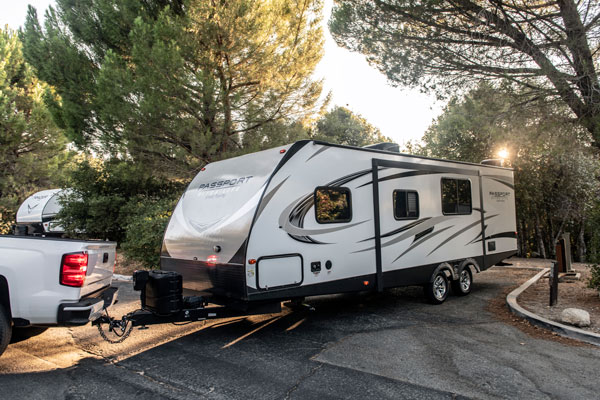
Travis and Casey greeted us on a gator golf cart and escorted us to our site. The communicated via walkie talkie and helped us back into our spot – number 67. We were able to join the “parked it on the first try club” & were congratulated with a fist bump from Travis. He then showed us our utility locations and helped us get plugged in.
The gravel site was mostly level but we did use a few leveling blocks on the rear to make it perfect. Some sites had a pretty significant slope so it is probably a good idea to pack extra leveling blocks, even if you have auto levelers.
We settled into our spot easily and took a walk around the campground. It was built in the 1970s and has all the vintage charm of the era. Yellow hand painted signs made of redwood slices number the sites and point out hiking trails as well as the restrooms. There are coin operated showers in the bathhouse so be sure to bring spare quarters if you plan on using the facilities.
Around the corner from the bathhouse is a stage and communal fire pit. We were treated to campground karaoke during the holiday weekend – Disney songs were a hit with the families camping.
We enjoyed cool days under the redwoods as temperatures nearby broke 100* F. We took advantage of the on-site hiking trails a few times during our stay. There is a pond with a family of otters on the property and if you’re lucky you might get to see them.
If you’re really lucky you’ll be able to meet “Spirit” the three legged tabby cat. We didn’t ask what happened to his leg – that seemed rude – but he stopped by a few times to ask us for pets and head scratches – we gladly obliged.
Everyone was SO friendly – the staff and the fellow campers. We enjoyed s’mores one night with our neighbors across the way & spoke to many of our neighbors in passing. There are several permanent residents on the west side of the park, they have a separate entrance and are separate from the short term campground area. Trash is picked up right from your site, just set the provided can at the end of your site and the guys pick it up each evening for you – this makes sure no hungry critters get in during the night. Beware this is bear country!
Travis, who we later learned is the new owner & manager, stopped by several times throughout our stay to check on us, even bringing us firewood directly to our site in the gator golf cart. Fire wood is $15 for a whole cord of wood and your first bundle is free! Our bundle was stacked & waiting for us next to the fire ring when we arrived. We learned Travis, the owner, even personally drove a family up to town when they were having car issues late in the evening and Uber wasn’t available. The customer service, willingness to help, and attention to detail here is unmatched.
Speaking of Uber, don’t depend on ride-share or cell signal here. Cell signal is not available for most carriers. There is 4G reception with Verizon ONLY. Our verizon phone hotspots worked surprising well and we were able to get on Zoom calls and such but there was definitely no star link coverage with the large tree canopies filling the sky.
Speaking of the trees, that was the best part! We were able to camp right under the enormous redwood trees and take in their beauty right from our campsite. Many afternoons were spent by the fire watching birds flit around the redwood trees. If you’re in to the more unique creatures – banana slugs were frequent visitors; slimy but harmless – and kinda cool to watch as they slowly make their way around. These slugs are native only to the redwood forests on the west coast and are bright yellow, sometimes with spots.
Overall, we give this campground a 10/10! The over the top customer service was soooo appreciated and was a huge contrast to other places we’ve camped. The redwoods provided a picturesque & relaxing backdrop, I even broke out my hammock. This is the only campground in the redwoods in close proximity to Fort Bragg & Glass Beach which is less than a 10 minute drive away. We enjoyed hunting for sea glass at this famous beach!
Travis & Kay have big plans for the future of the park including adding live music events on the weekend & opening a camp store. If you’re ever in the area, please check this place out and tell Travis & Kay we said hi!
Summer is quickly approaching and it’s time to be outside – cooking up the best meals on the best camping grills. Nothing beats the convenience of having a portable grill. Whether you’re cooking up some burgers, hot dogs, or even a full meal, a portable camping grill is an essential piece of equipment for any camping trip. But with so many options on the market, which one should you choose? In this blog post, we’ll take a look at some of the best camping grills.
Time to read:
3–4 minutes
Before jumping into the blog:
Please consider joining the gone community by subscribing below & following us on social media. It’s 100% free, and well worth the price of admission. We’ll update you with the newest RV lifestyle stories, tips and tricks, mental wellness tips, and so much more. DMs are always open to chat, and we’ll answer any questions you have about this lifestyle – it doesn’t have to be scary! We also promise not to spam your inbox with junk – we don’t care for that either.
Blackstone Tailgater, one of the best camping grill options.
The Blackstone Tailgater is a versatile grill that is perfect for camping. It has a cooking surface of 512 square inches, which is large enough to cook for a large group of people. The Tailgater also features a griddle top, which means you can cook pancakes, eggs, and more.
Weber Q120 is a compact, portable camping grill that is perfect for cooking the camping necessities for a few people.
The Weber Q1200 is a compact, portable grill that is perfect for solo camping. It has a cooking surface of 189 square inches, which is plenty of space for burgers, hot dogs, and a few more small items. The Q1200 also features a built-in thermometer, which makes it easy to monitor the temperature of your food.
Coleman RoadTrip 285 is a versatile portable camping grill with interchangeable cooktops – allows for different types of cooking styles in a small form-factor.
The Coleman RoadTrip 285 is a versatile grill that is perfect for the camper who wants flexibility. It has a cooking surface of 285 square inches, which is large enough to cook for a small group of people. The RoadTrip 285 also features interchangeable cooktops, which means you can use it as a grill, griddle, or stove.
Cuisinart CGG-180T is a small camping grill for a few people. It’s extremely portable and also the cheapest on this top camping grills list.
The Cuisinart CGG-180T is a compact, tabletop grill. It has a cooking surface of 145 square inches, which is enough space to cook for a small group of people or a large meal for a solo camper. The CGG-180T also features a built-in thermometer, which makes it easy to monitor the temperature of your food.
Char-Broil Grill2Go X200 is a rugged, portable camping grill with enough cook space for a small group of people.
The Char-Broil Grill2Go X200 is a rugged, portable grill that is built to last. It has a cooking surface of 200 square inches, which is plenty of space to cook for a small group of people. The Grill2Go X200 also features a built-in thermometer, which makes it easy to monitor the temperature of your food.
Which camping grill do you like the most? Do you have a large family and need something larger like the Blackstone Tailgater? Or are you used to roughin’ it in the great outdoors and want the most rugged and tough camping grill?
No matter which portable camping grill you choose, make sure to read the manufacturer’s instructions carefully before using it. Always follow safety guidelines and make sure to keep the grill away from anything that could catch fire – tents, awnings, etc. With the right portable grill, you’ll be able to enjoy delicious meals while enjoying the great outdoors.
Advertisements
Our DMs are always open on social media if you want to connect, ask any questions about RV life, or just to bounce some ideas off us before you take off on your next trip.
Please consider joining the gone community by subscribing below & following us on social media. It’s 100% free, and well worth the price of admission. We’ll update you with the newest RV lifestyle stories, tips and tricks, mental wellness tips, and so much more. DMs are always open to chat, and we’ll answer any questions you have about this lifestyle – it doesn’t have to be scary! We also promise not to spam your inbox with junk – we don’t care for that either.
Want to continue reading? We’ve got plenty more blogs to binge read 🙂
National Parks are incredible and almost other-worldly. If you haven’t visited one yet, make sure you add one or two to your summer plans now. We’ve been lucky enough to camp at 10 national parks so far, and every single one of them in the national park system have been incredible.
Theodore Roosevelt, often called “the conservation president,” impacted the National Park System well beyond his term in office. He doubled the number of sites within the National Park System during his time in office. Between 1901 & 1909, President Teddy Roosevelt signed legislation establishing five new national parks within the National Park System: Crater Lake, Oregon; Wind Cave, South Dakota; Sullys Hill, North Dakota (later re-designated a game preserve); Mesa Verde, Colorado; and Platt, Oklahoma (now part of Chickasaw National Recreation Area). By the end of his term the US was the proud protector of
There is nothing so American as our national parks … The fundamental idea behind the parks … is that the country belongs to the people, that it is in process of making for the enrichment of the lives of all of us.
Teddy Roosevelt
We’re going to show you all of the current national parks by state with images and short explanations. If you’re looking for the ultimate adventure, then this list is where to start with the national park system.
Advertisements
Please consider joining the gone community by subscribing below & following us on social media. It’s 100% free, and well worth the price of admission. We’ll update you with the newest RV lifestyle stories, tips and tricks, mental wellness tips, and so much more. DMs are always open to chat, and we’ll answer any questions you have about this lifestyle – it doesn’t have to be scary! We also promise not to spam your inbox with junk – we don’t care for that either.
Denali National ParkGates of the Arctic National Park and PreserveGlacier Bay National ParkKatmai National ParkKenai Fjords National ParkKobuk Valley National ParkLake Clark National ParkWrangell-St. Elias National Park
Wouldn’t you love to wash up on this shore at American Samoa National?National Park of American Samoa
National Park of American Samoa, American Samoa
Arizona
We went to the Grand Canyon in December 2022 – incredible!Grand Canyon National Park, ArizonaSagauro National ParkPetrified Forest National ParkPetrified Forest National Park, Arizona
Grand Canyon National Park, Arizona
Petrified Forest National Park, Arizona
Saguaro National Park, Arizona
Arkansas
Hot Springs National Park, ArkansasHot Springs National Park, Arkansas
Hot Springs National Park, Arkansas
Advertisements
California
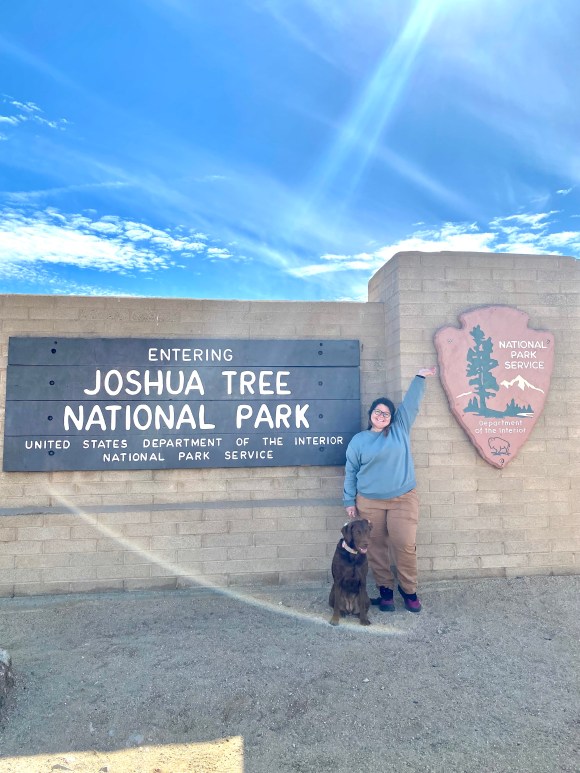
Channel Islands National ParkKings Canyon National ParkMe at Zabriskie Point in Death Valley, January 2023Death Valley National ParkJoshua Tree National ParkMe at the Palm Oasis, Joshua Tree, March 2023Lassen Volcanic National ParkLassen Volcanic National ParkPinnacles National ParkRV’s can’t fit through Redwood trees, LOL, Redwood National ParkRedwood National ParkEl Capitan, Yosemite National ParkGeneral Sherman Tree (the world’s largest tree) at Sequoia National Park
Black Canyon of the Gunnison National ParkRocky Mountain National ParkGreat Sand Dunes National ParkOur Luna at Great Sand Dunes National, November 2022Mesa Verde National Park
Black Canyon of the Gunnison National Park, Colorado
The climate is tropical in Biscayne National ParkBiscayne National ParkEverglades National ParkMarsh swamps in Everglades National ParkDry Tortugas National Park
Biscayne National Park, Florida
Dry Tortugas National Park, Florida
Everglades National Park, Florida
Hawaii
Haleakala National ParkA barren landscape in Haleakala National ParkHawai’i Volcanos National ParkWaterfall and spring at Hawai’i Volcanoes National Park
Haleakala National Park, Hawaii
Hawai’i Volcanoes National Park, Hawaii
Advertisements
Idaho
Grand Prismatic Spring in Yellowstone National ParkYellowstone National ParkGeysers spray hot spring water in all directions at Yellowstone National Park
Yellowstone National Park, Idaho, Montana, and Wyoming
Kentucky
A shot we took of former mining operations while in cave at Mammoth Cave National Park
Great Smoky Mountains National Park, North Carolina and Tennessee
Texas
Under the starts at Big Bend National ParkBig Bend National ParkGuadalupe National Park
Big Bend National Park, Texas
Guadalupe Mountains National Park, Texas
Utah
Arches National ParkBryce Canyon National ParkCanyonlands National ParkHorseshoe Bend at Canyonlands National ParkCapitol Reef National ParkA cave within Zion National ParkZion National Park
Virgin Islands National ParkBeautiful Palms at Virigin Islands National Park
Virgin Islands National Park, Virgin Islands
Virginia
Shenandoah National ParkSprawling hills of Shenandoah National Park
Shenandoah National Park, Virginia
Washington
The beach at sunset at Olympic National ParkOlympic National ParkExcellent trail view at North Cascades National ParkNorth Cascades National ParkMount Rainier National Park
We have merchandise now! Everything from stickers, water bottles, RV pillows, blankets, and plenty of clothing options (t-shirts, shorts, yoga pants, sports bras, hoodies, and more!)
You can click the above green hyperlink, any of the below images, or copy and paste the link below into a new browser window. Any of these will get you to our new merch store – and we know you’ll find something awesome!
Pictured above are all of the 6x custom designs that we have. These are all sample images of the merch we currently are selling, although plenty of other colors, sizes, and products are available on our official store!
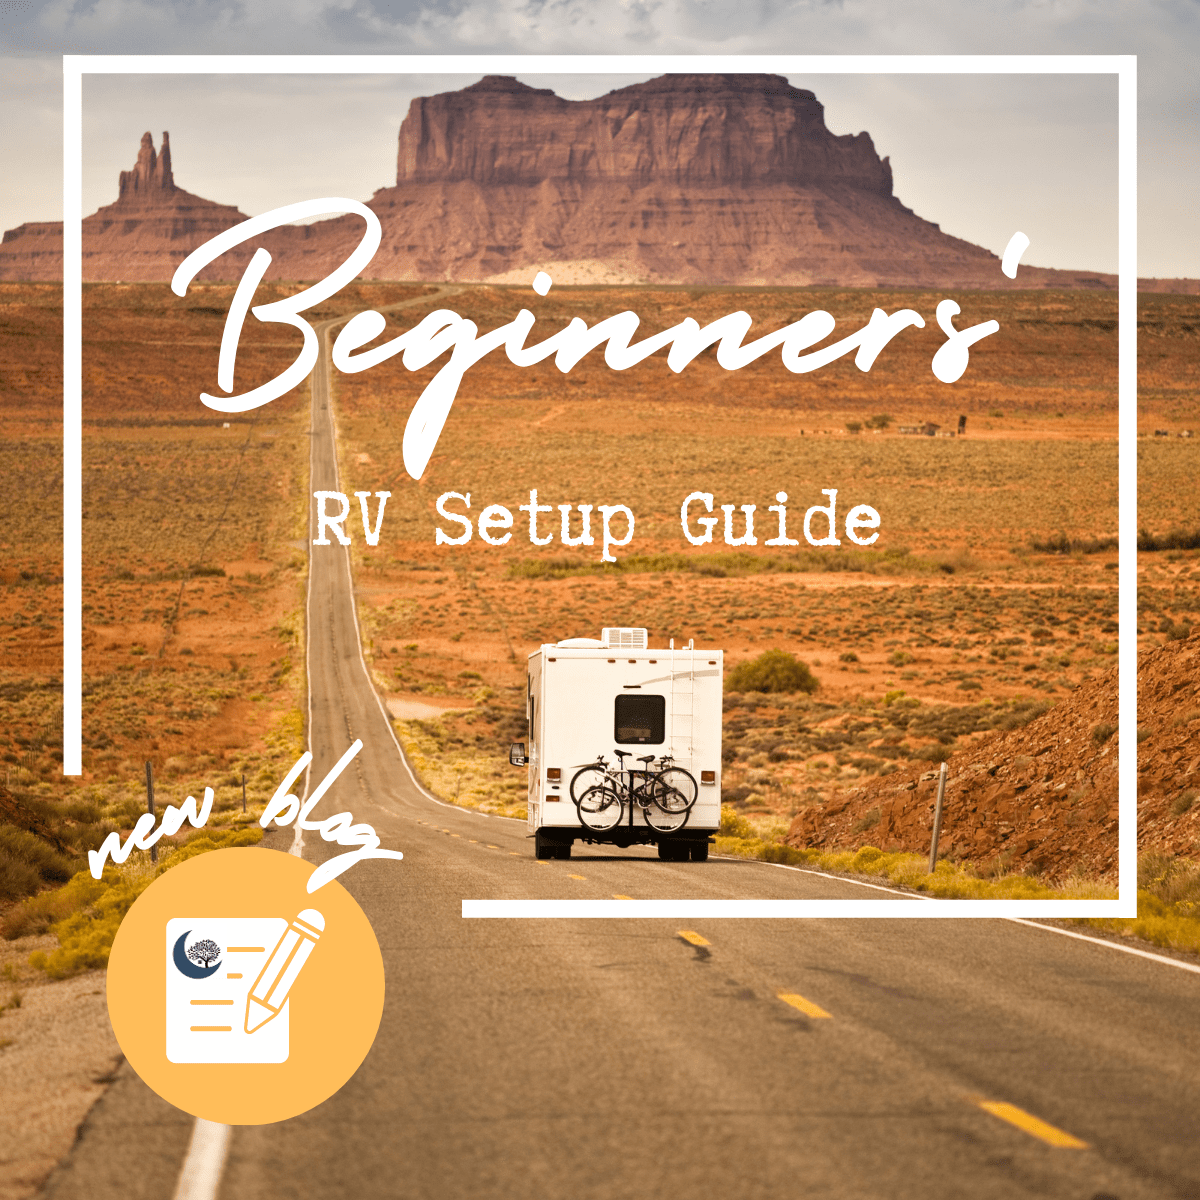
If you haven’t used a RV before, it can be a little intimidating. We’ve been there too (we all started as newbies!), so today we’re bringing you this RV guide for beginners to help make the process painless. After reading this RV guide, you’ll learn how to setup your campsite and all the needed utilities for a RV. This will get you out in the great outdoors and finding your next adventure in no time. We’re Matt & Bree with No Place Like Gone, and we’ve been living and traveling the US full-time in a RV for almost a year now, here are our tips for setting up an RV for the first time.
Time to read:
9–13 minutes
Please consider joining the gone community by subscribing below & following us on social media. It’s 100% free, and well worth the price of admission. We’ll update you with the newest RV lifestyle stories, tips and tricks, mental wellness tips, and so much more. DMs are always open to chat, and we’ll answer any questions you have about this lifestyle – it doesn’t have to be scary! We also promise not to spam your inbox with junk – we don’t care for that either.
If you have any questions while reading this RV guide, make sure to shoot us a DM on social media with the below links:
Below are the basic steps of RV set up, from pulling in to the campground to roasting those s’mores. Keep reading for a detailed description of each step.
Arrive at campground
Find site number
Park in site
Level
Release slides (if you have them)
Hook up your utilities
Electricity
Water
Sewer
Enjoy camping!
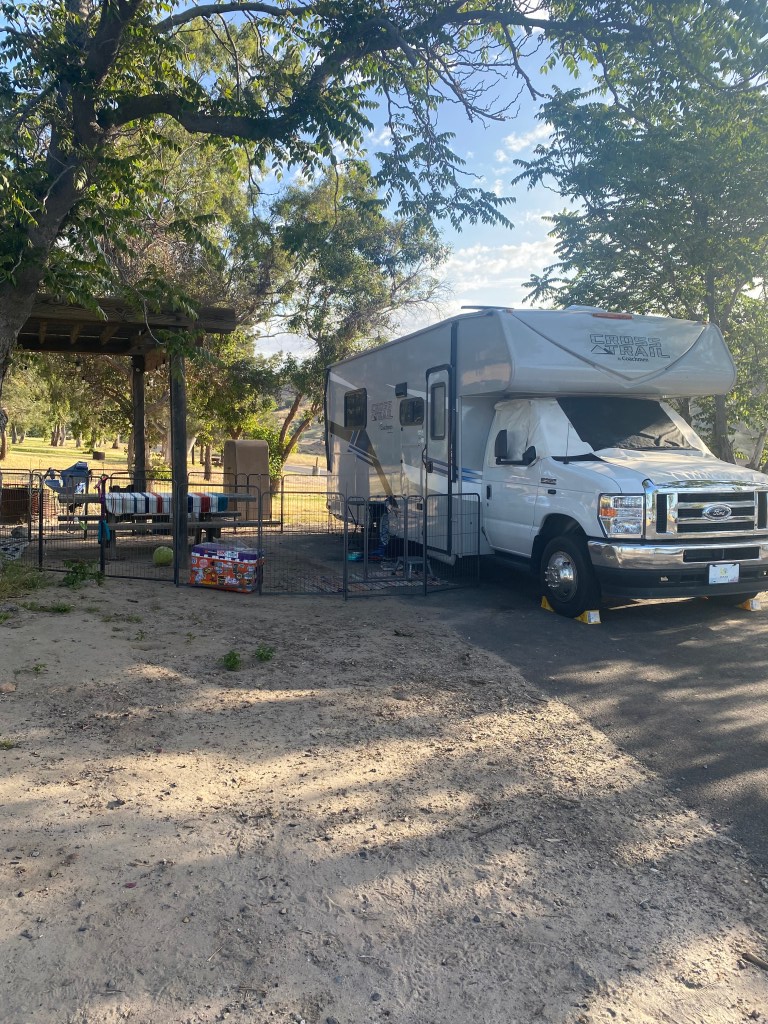
Arriving at the Campsite
Our RV parked in a campsite in SoCal.
Once you get to the campground you’ve decided to stay at, you’ll have to find where your campsite number is.
Generally, numbering starts from smallest to largest and increases the further you drive. Go slow and pay attention to directional signs. Once you find your campsite, park in front of it but make sure you aren’t blocking the road. You’ll want to hop out to walk the perimeter of the campsite before parking.
Look for where the utilities are located in the campsite (electricity, water, sewer) but keep in mind not all campsites will have all three. Confirm where the utilities hook up on your RV or camper (typically on the driver’s side).
Check and see whether it’s easier to pull-in or back-in to the spot, typically you can tell by how the campsite is angled against the road – the utilities will also help determine this.
Park Your RV With This Guide
If you aren’t by yourself, you’re in luck (for many reasons). The person with you should hop out so that they can help guide you into the spot. Parking an RV takes teamwork! This is especially important when you are guiding your RV back into a spot. Instead of shouting throughout the campground, it’s best if you get on the phone to communicate directions with each other.
Backing up a trailer is no easy feat for a newbie – it takes practice AND patience.
Once backed into the spot, give yourself a pat on the back! If you managed to miss hitting anything, give yourself another pat on the belly … it’s dinner time! Well, first you have to hook the RV up to power, water, and all of the other things but you’ll be bbq’ing in no time.
RV Leveling Guide
You’ll want to make sure the RV is level so that you don’t trip, get hurt, or feel wobbly. There’s also other benefits behind this like water and propane flowing properly as well. If your fridge runs off of propane it is especially important to be level to prevent damage to your appliance.
If you’re renting a RV or camper, you might not have the right equipment to level. Make sure to check with who you have rented fromif to confirm they provided leveling instructions.
Auto-Levelers
One type of auto-leveler.Another type of auto-leveler.
If you have auto-levelers, you are the luckiest of all. You would know this because they are a huge deal in the world of RVs. With auto-levelers you can press a few buttons and be leveled within a minute or two. That makes things easy, right?
Jack Stands
With automatic jack stands, you can press the buttons to maneuver the jack stands down onto the ground to help you level and support your RV. If you have manual jack stands, you’ll have to use an impact drill or lever to turn the jacks to the proper height on each side.
Leveling Blocks
10-pack of Camco leveling blocks. Click the image above to be taken to the blocks we recommend on Amazon.
We use leveling blocks because we’re cheap, woo! With these, you’ll have to pull up onto the blocks and check your levels a few times until you get it right. The blocks interlock and stack just like legos, nothing fancy here, folks.
Quick Guide to Slide-Outs
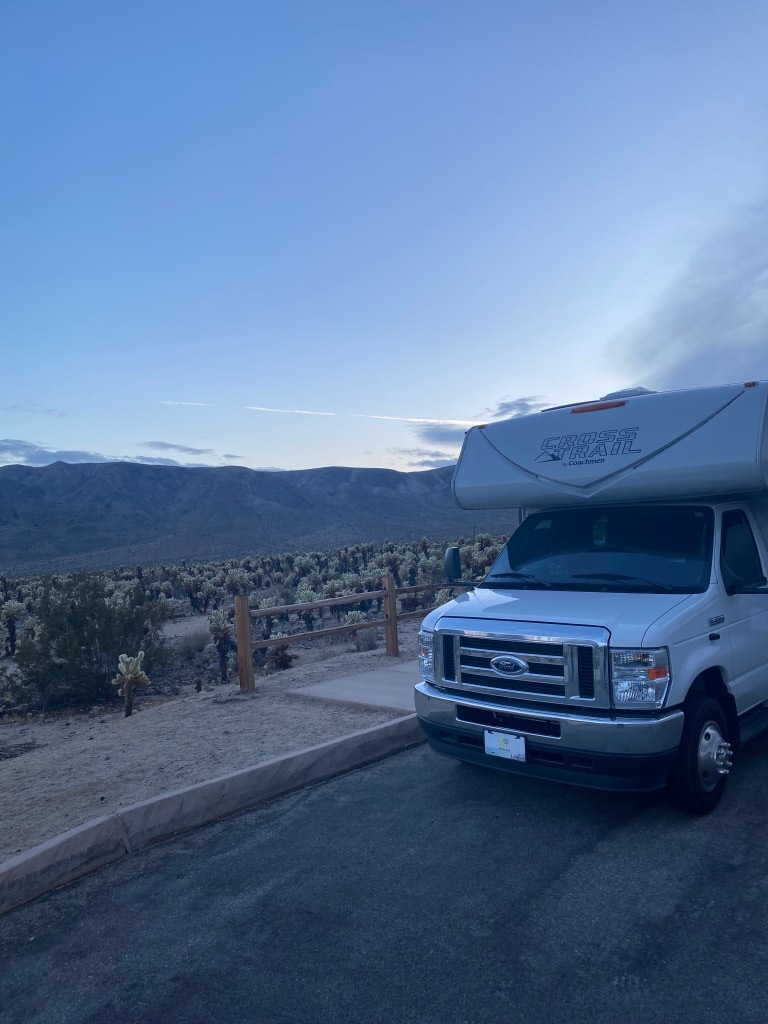
Slide-outs are a great way to gain additional space in your RV’s floor plan. Many rigs have 2-3 slide-outs and there’s also some without any. We live full-time in a 2022 Coachmen Cross Trail 23XG which is a model with no slide-outs.
Our motorhome: 2022 Coachmen Cross Trail 23XG in Jacksonville, FL.
You’ll want to make sure that how you parked allows adequate room for the slide-outs on each side. This will mean that you can not be parked too close to trees or any other obstructions.
Insider tip: Typically you’ll have to leave the engine running of your motorhome to operate the slides, whereas campers and travel trailers do not have this problem.
By finding the slide-out control panel (probably located in the interior of the entrance to your RV) you can operate the slide-outs with the buttons. Make sure that you don’t hear any crazy or weird noises as they are extending out.
Insider tip: You can also open the windows so that you can watch as the slides come out. This will give you extra views to watch any trees or potential danger objects.
Utilities Guide for RVs
Electrical Hook-up
We’re going to have a crash course on RV utilities. Make sure you have all the proper RV accessories and necessities if you are new to camping so that you don’t have any issues when you get to the campsite.
For the renters: if you’re renting, you should have a water hose, sewer hose, power cord, and potentially other accessories with your RV. Make sure to check with who you’ve rented from to confirm what came with your rental.
An electrical surge protector is highly recommended. Click the image to see the one we use from Amazon.
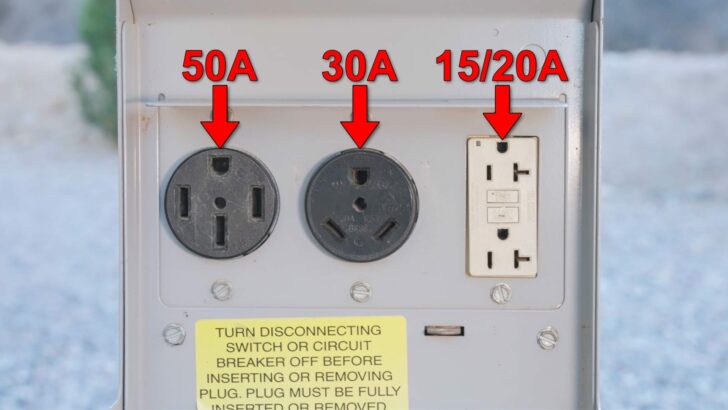
You’ll want to hook up your electrical surge protector and flick on the 30A or 50A breaker depending on what your RV or camper is. You’ll find this out by which cord you have – it’s either 3-prongs or 4-prongs.
50A with four prongs (far left), 30A with three prongs (middle), 15/20A is a house electrical outlet (far right).
Do not hook up your RV or camper power cord yet! You should only be putting an electrical surge protector to the power pedestal (a sophisticated word for “electrical hook-up”).
Flick on the 30A or 50A depending on your cord, and check if the power is all green lights and safe to use. Otherwise, bring up any grounding issues or faulty electrical problems to the campground staff immediately.
Once your surge protector gives you an A-O-K, it’s time to move on to the power cord. Flick off the 30A or 50A breaker (depending on which one you turned on) to connect your power cord to the surge protector. After, connect the other side of the power cord to your RV electrical connection port. Now is time for the power – flick the corresponding breaker from back on.
Water Connections
A water pressure regulator is recommended to protect the plumbing in your RV. Click the image to see the one we recommend on Amazon.A water filter guarantees you’ll have cleaner water coming into your RV. You’ll want this if you plan to drink the water. Click the image to see the one we recommend on Amazon.
You’ll want to start with turning on your water spigot at the campsite to verify that it works. Let it run for 20-30 seconds to remove any sediment and water that may be settled down in the pipe. Now you can turn it back off.
It’s time to connect your water pressure regulator. One end of the water hose will then connect to the water pressure regulator, and the other end to the water connection on your rig (another word for RV). Be sure to look for the connection that says “city connection” or something similar and NOT “tank fill” – otherwise you’ll be filing your fresh water tank only!
Now you can jump for joy because all you have remaining for this section of the RV guide is to turn on the water and hope for plumbing to do its job. If you notice any leaks or spraying, turn off the water and try to tighten the connection where you saw an issue. Usually this is a simple and quick fix.
Sewer Connections
Remember, not all campsites will have all of these utility connections. Sewer is the least common to see, but many places that are more expensive do have a hook-up for this. If you want to know what van life is actually like, you may end up with poop on you at this point. Just warning you now so that you are prepared for the inevitable.
You’ll want to put one end of the sewer hose aka stinky slinky (lol, it literally is one though) to the waste connection on your RV. This will be a black plastic valve somewhere under the RV near the other utilities at the rear.
MAKE SURE THE SEWER VALVE HANDLES ARE CLOSED! There should be two of them and both should be closed or you will end up with a mess on your hands.
After connecting to your RV, place the other end of the poop slinky (I coined this term) down into the campsite sewer connection on the ground. From here you can let the tanks fill and dump once or you can let the gray drain while you’re parked. If you opt to leave the gray open (sink and shower waste) be sure temperatures won’t be dropping below freezing. Whether you dump once or leave the gray open, you have to leave the black tank (toilet and poop) valve closed and only dump it when you’re ready.
Insider tip: When you go to leave, you’ll always drain the black tank first and then the grey tank after because the sink water will help wash down the poop hose and any potential clogs.
Our new camping merch will level you up from RV beginner to RV pro.
Get to Camping!
That’s basically it … you’ve made it through this RV Setup Guide for Beginners. It wasn’t that bad, was it?
There’s plenty more to learn about this lifestyle, and we want to share it all with you. But the very best way to learn about it – go on a camping trip yourself!
And, we really want to hear about your adventure. If you’re reading this guide, that means you’re probably about to go somewhere awesome very soon. So, where are you camping? Tell us about it in the comments below.
Where Will Your Next Adventure Be After Reading Our RV Guide?
If you liked the blog, please share it with your friends (links below):
Please consider joining the gone community by subscribing below & following us on social media. It’s 100% free, and well worth the price of admission. We’ll update you with the newest RV lifestyle stories, tips and tricks, mental wellness tips, and so much more. DMs are always open to chat, and we’ll answer any questions you have about this lifestyle – it doesn’t have to be scary! We also promise not to spam your inbox with junk – we don’t care for that either.
DM us on social media (with the buttons below) if you have any questions or feedback about the blog today!
When most people think of California they think of sunny LA, the glitz and glam of Hollywood, or the Golden Gate Bridge. And those things are great, don’t get me wrong, but did you know that California is also home to over 1,000 dairy farms? These farms produce about 4.8 million gallons of milk each year. In fact, in 2021, California dairy farmers produced 1/5 of the entire milk supply for the US. That’s a LOT of milk. And paired with Oreos … now I’m getting off track.
At our recent farm stay through Harvest Hosts we got to meet one of the families behind a 45+ year old dairy operation in central California – the Van Foekens!
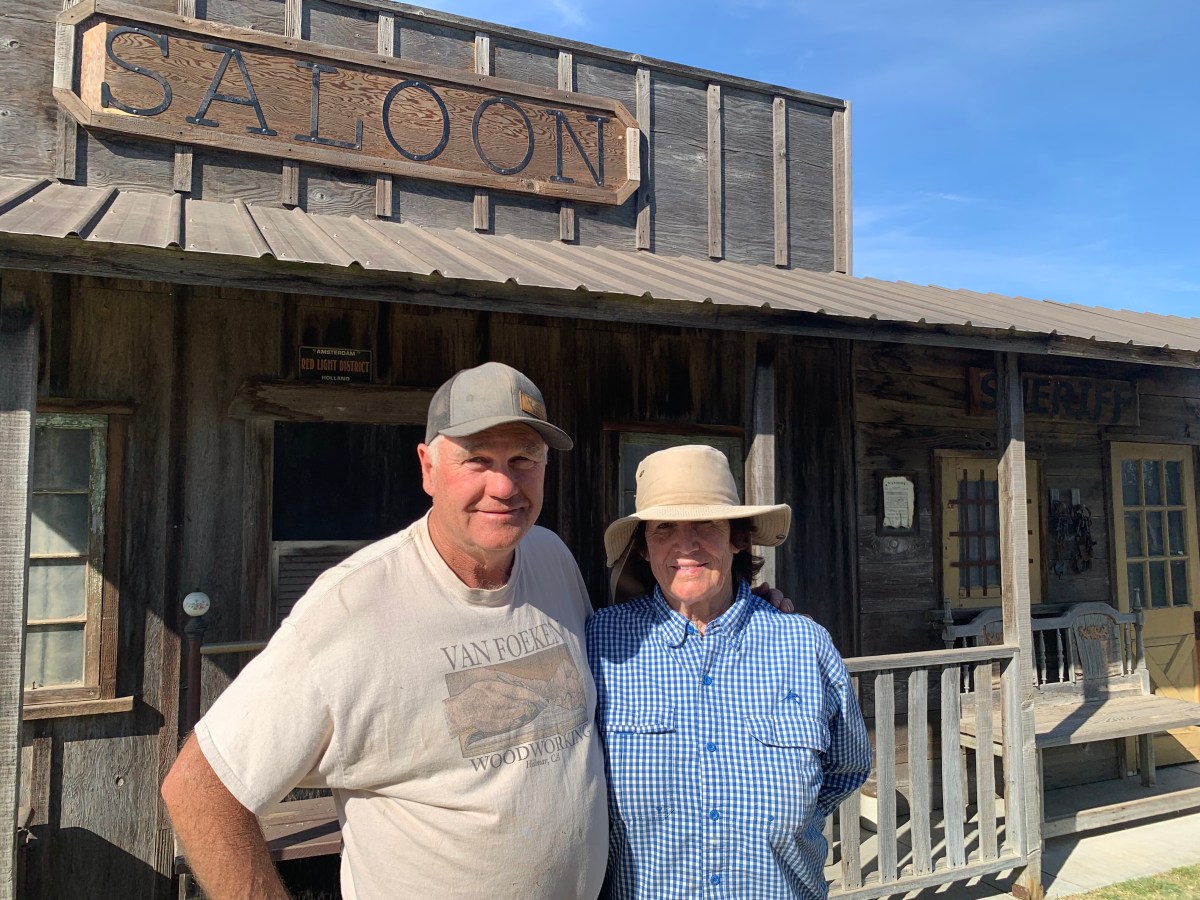
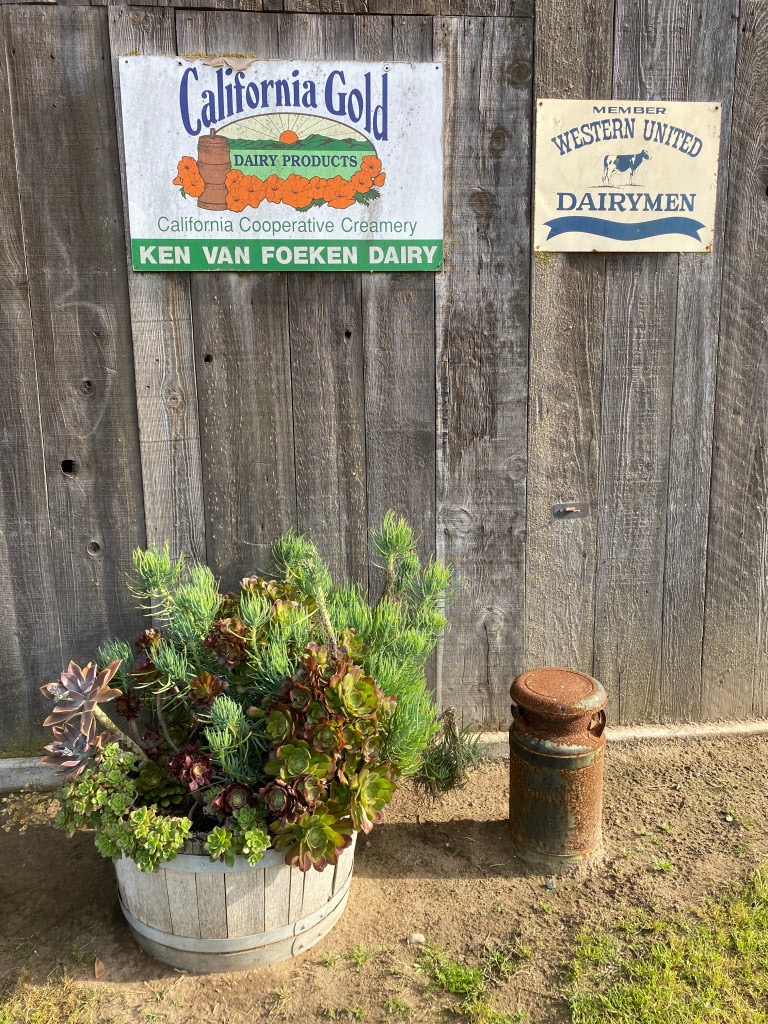
Ken & Susie Van Foeken – dairy farmers (one of their many occupations).
Advertisements
Ken and Susie bought the land for their farm in Hilmar, California in 1976. Ken was just 21 years old at the time and the two had just tied the knot. Talk about an adventure! The Van Foekens have now had a successful dairy operation for over 45 years.
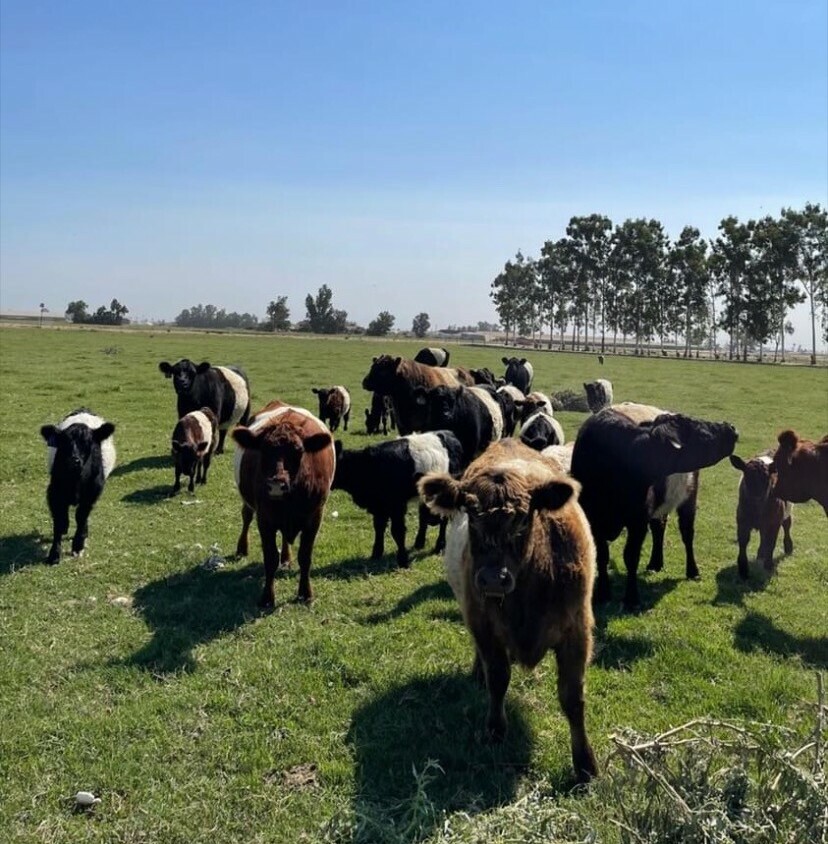
Some of the ladies that call the Van Foeken family dairy home.
Talking to Ken, it quickly became clear that the dairy isn’t the only legacy they’ve built over the years. Not one to ever meet a stranger, Ken greeted us with warmth and showed us around his immaculate property which includes a custom-built wood-working shop where Ken often enjoys spending his mornings wood working.
Advertisements
See below for some of Ken’s recent creations:
He also restored a vintage barn on the property with his son, it has quickly become a “party barn” and community hub. The barn even hosted prom for a local high school early on in the lockdown of 2020. When we arrived, Susie and Ken were busy pruning plants and getting ready for another community party on Sunday.
The Van Foeken Party Barn.
Advertisements
Susie’s BEAUTIFUL succulents in front of the Party Barn.
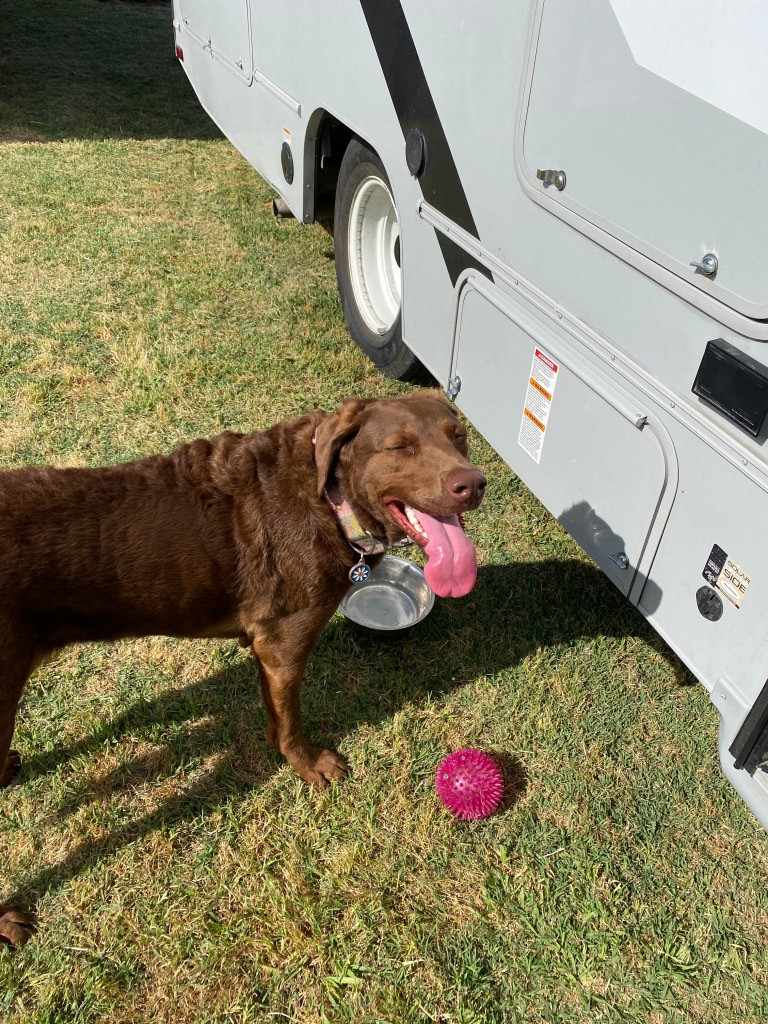
Our Luna girl enjoyed playing on the lawn with the Van Foeken’s Doberman, Jersey, until sunset. She’s aptly named for the jersey cows that they milk twice a day, every day.
Our Luna, tired after playing too hard.Luna enjoying the heck out of the dairy farm.Jersey, the Van Foeken’s Doberman.Luna girl is tired & happy after a long day.
Advertisements
Harvest Hosts is a unique camping program that allows you to stay at farms, wineries, breweries, museums, and more across the US for one annual fee. If you have a fantastic host like Ken was for us, you may even get a behind-the-scenes tour of their operation & learn something new. If you use our affiliate link (click here), you can get 15% off of your Harvest Host annual membership.
Camping doesn’t always have to be woods and bonfires – sometimes it can be a window into someone else’s daily life that creates moooo-emories to last a life time. 🐄
Ken and Susie Van Foeken’s Dairy Farm was a LOVELY Harvest Host location in central California.
Hey Folks – Thanks for Reading! What Did You Think?
We’d love to hear from you! Message us on social media – we’d love to hear about your next Harvest Host stay.
Please consider joining the gone community by subscribing below & following us on social media. It’s 100% free, and well worth the price of admission. We’ll update you with the newest RV lifestyle stories, tips and tricks, mental wellness tips, and so much more. DMs are always open to chat, and we’ll answer any questions you have about this lifestyle – it doesn’t have to be scary! We also promise not to spam your inbox with junk – we don’t care for that either.
We’ve got your cure for boredom – continue reading here:
If you’ve ever bought a RV (brand new or new-to-you) then you know that not everything comes included – especially RV niceties. Expect to be searching Google for RV accessories near me a lot! Even brand new models need customizing to fit your liking. It’s similar to buying a house or renting an apartment, you’ve got to make it feel like YOUR home. Even if you LOVE everything about your RV there are a few additional things you’ll need to purchase before you hit the road.
Amazon has taken our shopping habits and injected them with steroids. We can buy literally anything from the comfort of our own homes. The Amazon fairies make it so simple to click on the app and start shopping; their engineers know the algorithm and know exactly what you want. There’s plenty of things recommended by the algorithm to buy for your RV; these range from accessories, necessities, RV niceties, and doo-dads. But with millions of options, what do you actually need?Glad you asked, here’s some of our favorite Amazon buys for RV life.
Advertisements
RV Niceties, Necessities, & Accessories on the Amazon Shopping List
Here’s the link to the Amazon wishlist that I’ll be referencing throughout this blog if you’d like to see it for yourself. You can easily purchase through this link (nope, we won’t get paid if you do), or you can click any individual item below as you’re reading to add it to your Amazon cart. Let’s jump into the RV niceties!
RV Necessities:
Water Pressure Regulator: This bad boy is a must. Occasionally when camping, you will find campgrounds that have extremely high water pressure (we’ve seen 100+ psi). This is way too high for an RV. High pressure is a death sentence for your cheaper plastic and PVC piping in your RV. It is recommended to have your water pressure around 40-50 psi. A water pressure regulator reduces the pressure down to a level that is safe for your camper.
Advertisements
Electrical Surge Protector: Another must-have. You can not safely hook up your camper straight to shore power. Shore power (or power pedestal, or electric box) is the in-ground power that you connect your RV to at the campground, these typically have both 30amp and 50amp hookups. If for any reason the power pedestal was to fail, that current will travel directly into your home on wheels and fry some serious bacon. Let’s not do that … okay?
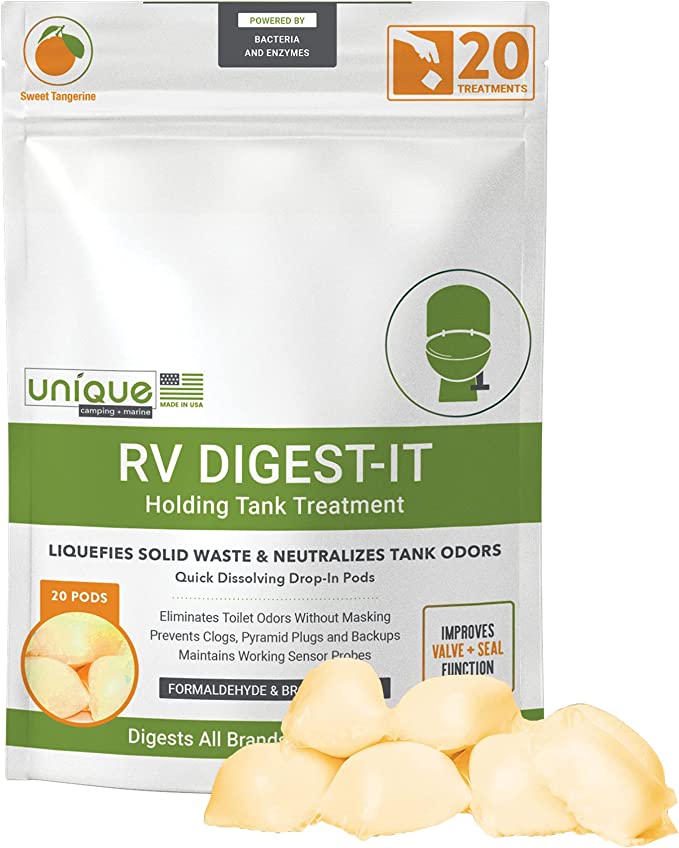
Unique RV Digest-It Holding Tank Treatment: RVs go hand-in-hand with poop jokes, and for good reason. If you aren’t properly treating your black tank, you will have a (brown) mess on your hands – pun intended.
Scared of having your own holding tank mishap? Don’t worry, you aren’t the only one. We have heard plenty of horror stories of people going to dump and the unfortunate things that occur at the dump station including the dreaded sewer shower. Unique’s products are literally the $h**t! pun intended.
Advertisements
They make everything liquid so you don’t have to worry about clogs, poop pyramids, or issues at that dump station. All you have to do is drop a pod in with some water each time after you use the dump station. Unique works its magic and you don’t have to worry.
This is a 10/10 product and works the best out of several tank treatment products we’ve tried – seriously buy some TODAY. We don’t have any affiliation with them but we would happily be a brand ambassador for them!
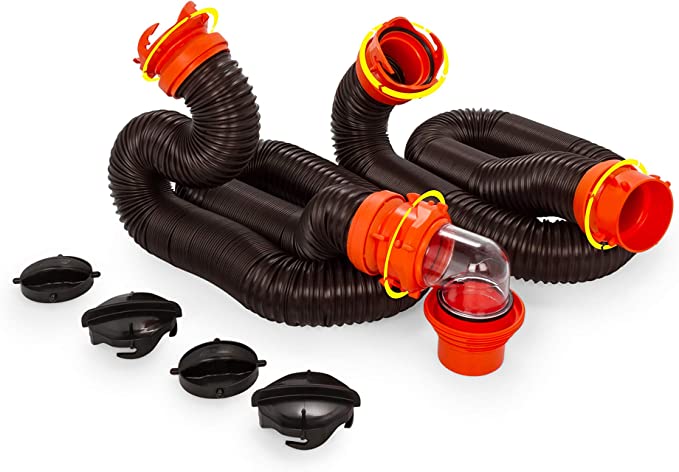
Sewer Hose Kit: Camco makes a LOT of great products for RVs. Make sure you keep them in mind when browsing parts because they are a reputable brand. I am in no way affiliated with them, but maybe one day they’ll hit me up too. Opting for a kit with a clear elbow will making dumping MUCH easier, allowing you to see if there are any issues and when your tank is empty. Be sure to get a second hose – sometimes the ground sewer connection is far away and sometimes your first hose may get punctured and unusable – a backup is always a good idea.
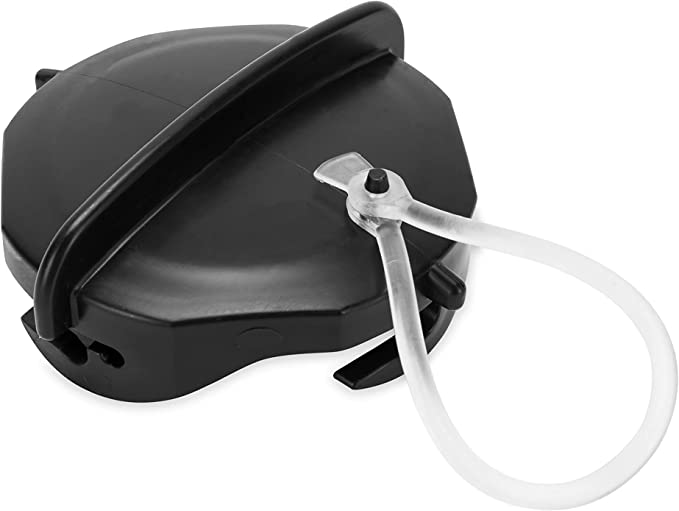
RV Sewer Hose Caps: You MUST have an extra one or two of these handy. If you’re in a class C like us, or any other rig with low clearance, it’s inevitable that you’ll hit a bump and crack or lose your cap in the process. It’s also possible that you lose one at the dump station.
You just never know; so, grab an extra for less than $10 and be prepared. Before we bought this one with the included tether, we lost our cap in a parking lot. We hopped out to grab it and before we could, we watched as someone krrrrunccched our cap with their car tires … lol, RV life.
Advertisements
RV Accessories:
Portable Ceiling Fans: These are a life saver, especially in spring and summer. Which is probably when you want to be camping anyway, right?! So, just go ahead and order two or three right now. You can’t go wrong with these fans as they can make it feel much cooler when temperatures outside begin to climb. This brand is USB powered which is an added bonus for times when you may be running off of house power and are conserving energy – no need to crank that noisy generator! This is one of our favorite RV accessories for the summer!
Outside Patio Rugs: Do you want to track all kinds of dirt, sand, and mud into your RV? Well you won’t have to if you have a nice outdoor rug. These will help you keep the outdoors outdoors and dramatically cut down on the amount of dirt getting tracked into your RV. They will also help keep your campsite clean for those of you that like to walk barefoot outside.
This is the one we recommend because it’s the one (even the same pattern) that we use! It’s survived almost a year on the road and is showing minimal signs of use. They also make cool ones with LED lights made into the perimeter of them if you’re feeling fancy.
Advertisements
Outdoor String Lights: Want your campsite to be a shining star in the night sky? Well you can with these string lights! Not only do the Edison style bulbs look awesome, but they also are outdoor and weather-rated. String these between trees at the campsite, along the ground, or from your awning to illuminate your space.
Just be sure to turn them off when you go to bed so you don’t keep anyone up with your lights. And believe me, the campground police will not be happy with you if you leave your lights on all night shining in your neighbor’s window. If you want to make sure won’t forget to turn them off, consider using a Christmas light timer like this one.
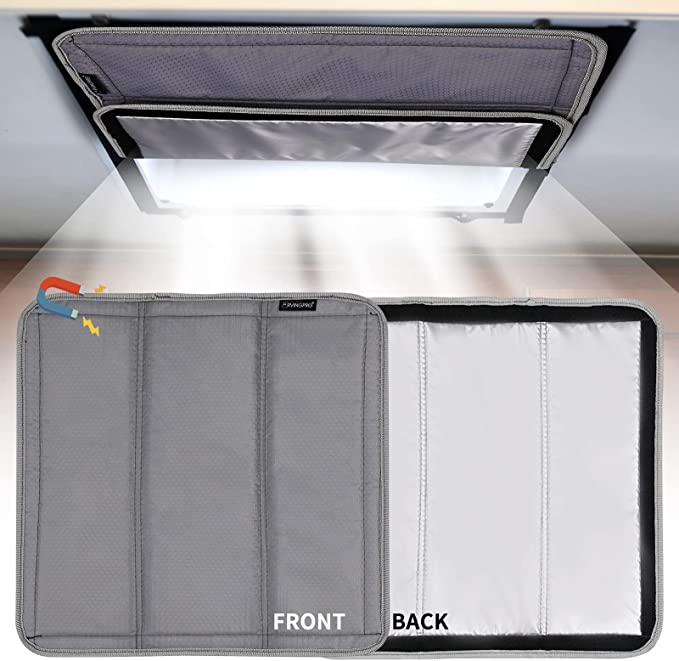
RV Vent Shades: These are great for keeping the heat out of your roof vents. In the spring and summer temperatures outside soar and you’ll feel it getting warmer inside your RV too. Block out the sun and heat coming in from your roof vents with these. They attach with velcro so they are removable and foldable if you want partial light. They are also reflective and come in a variety of colors. Grab one for each of your roof vents (we have three!) – you can’t go wrong with these RV accessories.
Advertisements
Wheel Chocks: You place these under your wheels when you get parked in a new camp site so that you don’t roll away – literally. You can also use a brick, a block of wood, or a freakin’ rock if you really wanted to. PLEASE please be sure to use your chocks if you’re parked on ANY type of incline – but they’re always a good idea regardless.
X-scissor jacks: For you peeps with fifth wheels and travel trailers, you’ve probably got two wheels on each side of your trailer, or maybe even three. With a scissor jack, you can anchor two neighboring tires to each other which will not allow them to roll you away. Wowzers!
Advertisements
RV Niceties:
Hydra Hide Gloves: Why do I recommend these bad boys? Because, they will keep your hands clean from any potential “brown problems” while also allowing you to get a good grip on your connections at the dump station. Some people like to use disposable gloves, like the doctor’s office uses, but you literally throw away money that way. Piling up disposable gloves in the trash is not good for the environment, is costly, and they are prone to tearing – ew. We highly recommend getting these affordable RV niceties.
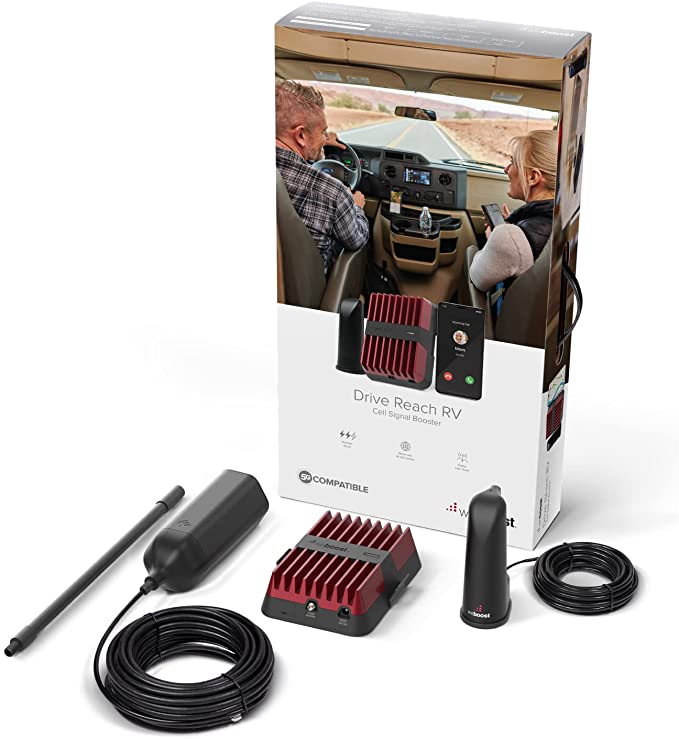
Weboost for RV: Have you ever been camping and had no cell signal?Welcome to the club, most RVers have. Having no cell signal is a very “typical” camping experience – especially when staying in state or national parks. These parks can be extremely remote – protected lands don’t have cell phone towers on them. This baby is expensive, but it’s worth it. A Weboost takes what little amount of signal there may be available in the airwaves, converts it, and them amplifies it back out to your devices to be a usable signal. We have had great luck getting signal in remote places with zero bars up to 3 bars or so. Worth it!
Advertisements
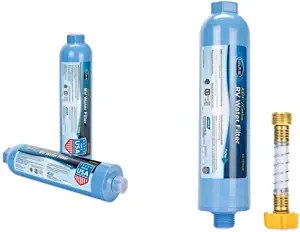
RV Water Filter: This is almost a necessity, but you don’t technicallyyyyy require one. Most of all, these filters ensure the water coming into your RV is clean and safe – you never know who was camping in the space before you. Hopefully it wasn’t the guy using the city water connection to flush his tanks, yum brownwater backwash. I understand that some people think all water is water, and they’re allowed to feel that way, but I don’t.
Doo-dads & RV Niceties
Stick-on Wall Hooks: These might seem dumb at first, but you’ll thank me later. These little hooks peel and stick on just about any surface and can hold decor, baskets, fans, lights, etc. We’ve used about 20 throughout our RV and they are easily removed without causing damage. Imagine what you can hang with these RV niceties.
Advertisements
Fuse Assortment: RVs have complex electrical systems that include fuses and breakers. RVs have traditional house-style breakers, but they also have car-style breakers aka fuses. You never know when a 10 amp fuse will blow. Sometimes a fix is as simple as swamping out a fuse for your lights or water pump.
Sewer Hose Seal: You can place this little doo-dad down into the ground sewer connection before you hook up. Then, you place your elbow or waste connection inside this fitting. Basically, it is a cone shape that tapers down so that you guarantee your sewer hose will fit any ground connection and will stay secure. Not all ground connections are universal, this allows you to adapt to multiple sizes.
Leveling Blocks: These are must-have RV accessories. There’s a billion different colors and sizes of these things, but what matters is that you get a ton of them. We have 40 blocks total for when parked on major inclines. Since our RV doesn’t have a leveling system or jack stands we rely heavily on these. Those with leveling systems or stabilizing jacks will not require nearly as many.
Advertisements
Cabinet Tension Rods: After you drive down a windy road to a campsite, park, and open your cabinet doors – what happens? Everything falls out in an avalanche because it was shaken up during the drive. These tension rods can be inserted into smaller (medicine-sized cabinets) to hold everything in place from falling out. They also make large sizes for bigger cabinets.
BONUS Section!
Want to see a few bonus RV niceties for your rig? Keep reading!
Other Camping & Unique RV Accessories:
Clear Storage Bins: You’ll learn that keeping a small fridge clean is quite a task. Organizing the fridge is the best start, so grab some clear storage bins on Amazon with this link or at your local TJ Maxx. These also go great in cabinets and other small spaces.
Dish Drying Rack: In such a small place, it’s hard to find a place to dry your dishes. After washing, plop them down on this drying rack suspended over your sink to dry.
Advertisements
Extension Cord: You’ll need extra outlets, there’s not nearly enough within your small space. You’ll need to charge phones, laptops, video game consoles, cameras, etc.
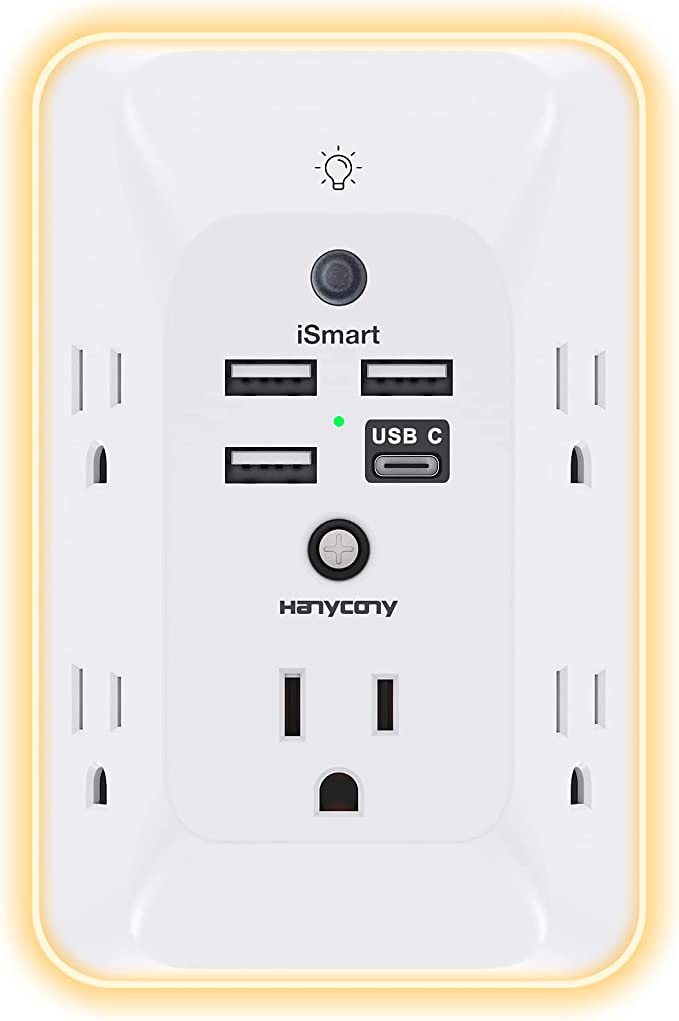
Outlet Extender: These things are quite handy … they basically take your two normal outlets and convert them into 5 outlets + USB + LED light on there.
Advertisements
What Did We Miss?
Did we miss your favorite RV accessories, doo-dad or thing-a-ma-bob? If it didn’t make the list, please write our PR team and complain. Kidding, please don’t do that. I am the PR team. What other tips and tricks do you have? Please drop a comment below so we can talk about it!
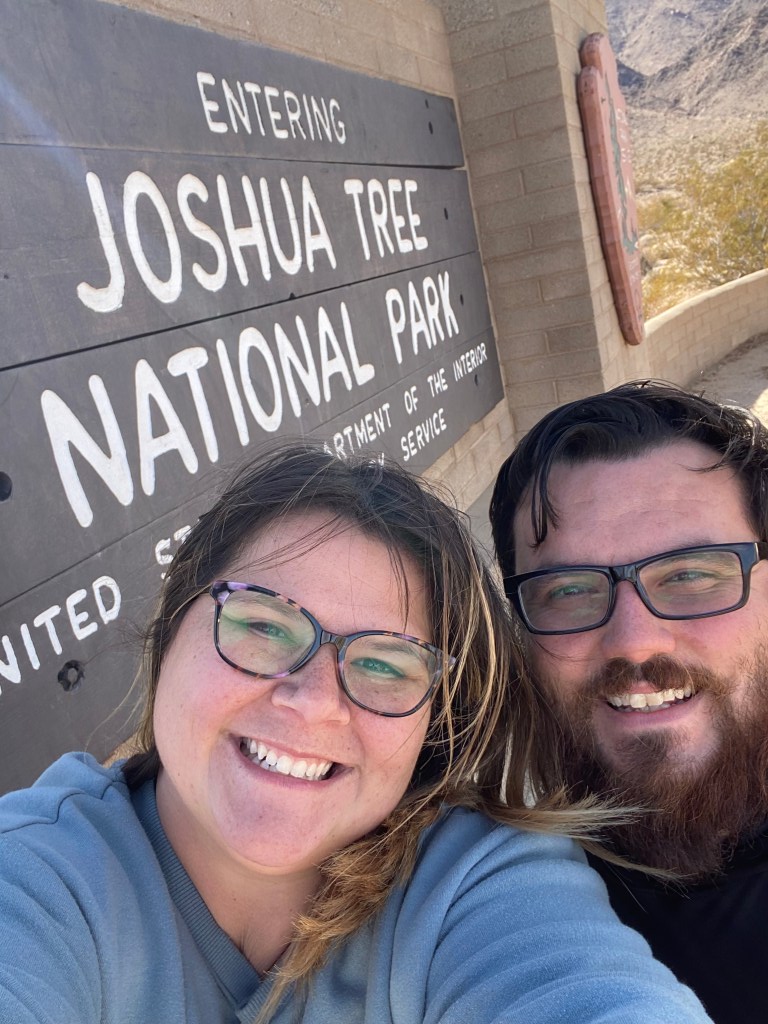
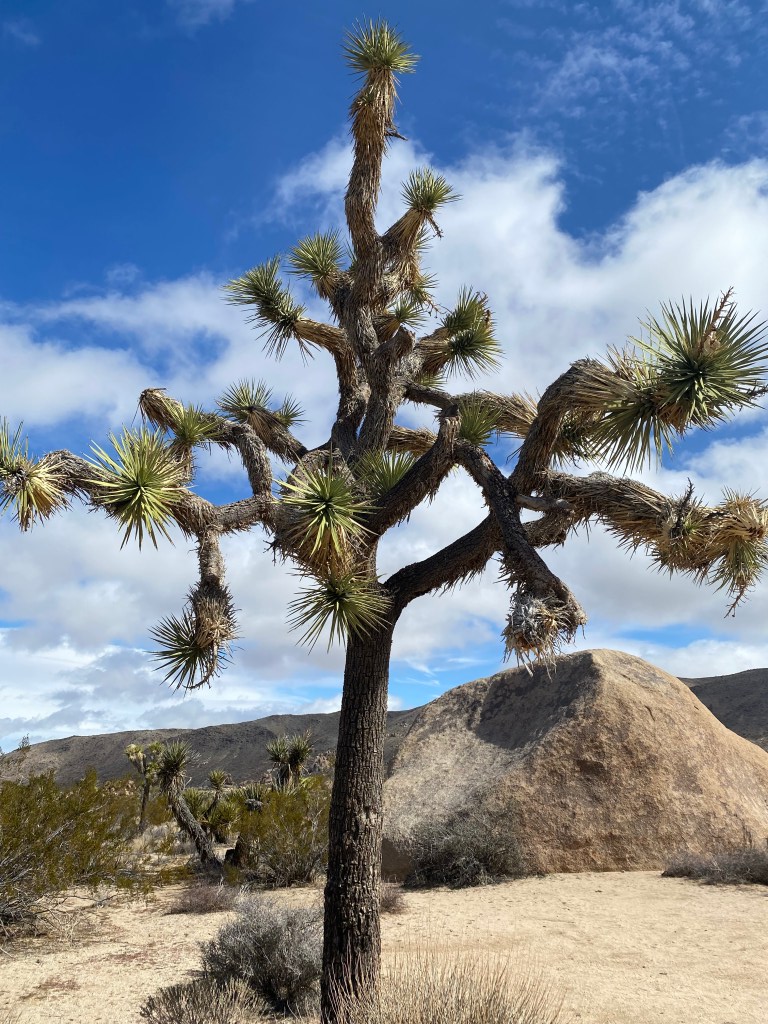
Joshua Tree National Park is located in southern California, covering an area of almost one million acres. The park is named after the unique (and eerie) Joshua tree, which is native only to the Mojave Desert and is found throughout the park. The park is a popular destination for nature lovers, hikers, rock climbers, and photographers of Joshua Trees.
Estimated time to read:
12–18 minutes
The park is divided into two distinct ecosystems: the Mojave Desert and the Colorado Desert. The Mojave Desert is characterized by its high elevation and rocky terrain, while the Colorado Desert is lower and has a more diverse landscape, including sand dunes and palm oases.
Advertisements
One of the most popular activities in Joshua Tree National Park is hiking. There are over 100 miles of hiking trails throughout the park, ranging from easy walks to strenuous hikes that require technical skill. Some of the most popular hikes include the Hidden Valley Trail, the Barker Dam Trail, and the Ryan Mountain Trail.
Joshua Tree National Park is also a VERY popular destination for rock climbers. The park has a whopping 8,000 climbing routes and is considered one of the best places in the world for bouldering. The park’s granite rock formations and unique geological features make it a challenging and rewarding destination for climbers of all skill levels. There are several local outfitters that will teach you to safely climb if you’re new to the sport.
In addition to hiking and rock climbing, Joshua Tree National Park offers visitors an incredible opportunity to stargaze. The park is located miles from major cities, which makes it an ideal location for viewing the night sky. Joshua Tree is a designated International Dark Sky Park and boasts some of the darkest skies in the U.S. On clear nights, visitors can even see the Milky Way.
Overall, Joshua Tree National Park is a must-visit destination for any nature enthusiast. Its unique landscape and diverse ecosystem offer visitors a truly unforgettable (and instagram worthy) experience.
Advertisements
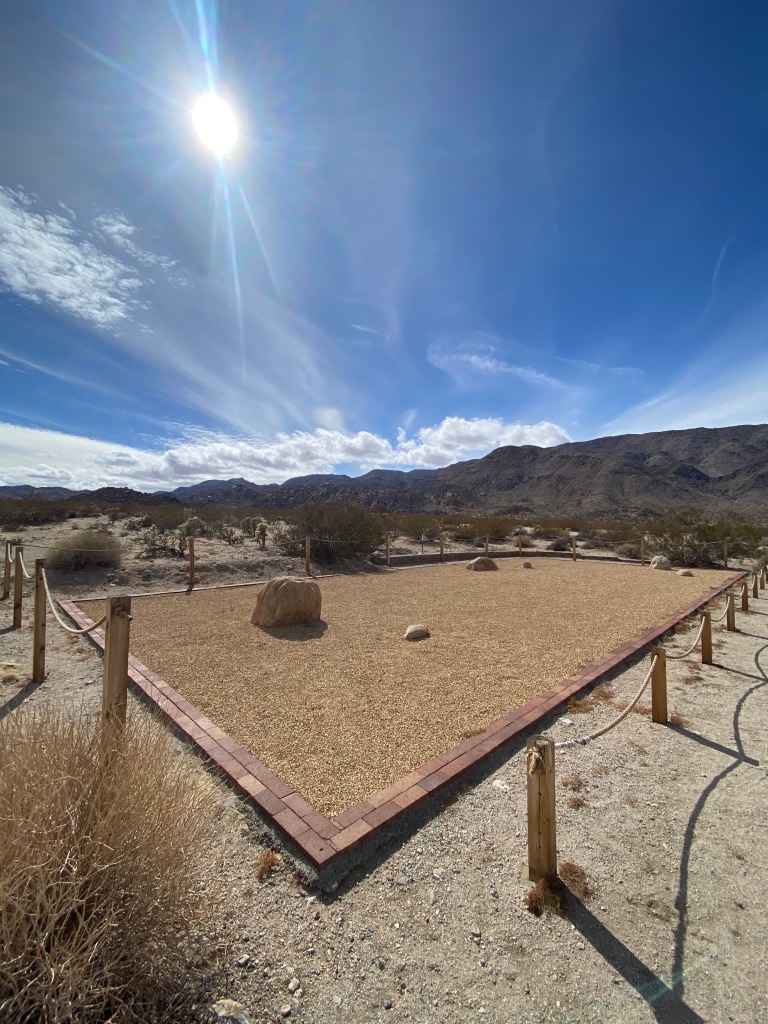
Map of Joshua Tree:
Joshua Tree National Park is the 15th-largest National Park in the United States. It’s a few thousand acres away from being a total of 800,000 acres – which is relatively small as far as National Parks go. From north to south, the park is close to one hour of driving distance but can take a little longer depending on your route planning & stops. The shortest route is along Park Boulevard, so if you stay on this road then you’ll save extra time.
Refer to the map below to plan your adventure and see the landscape. We’ve also included a downloadable PDF below to get you jumpstarted with planning your trip to the park!
We Had Bad Weather at Joshua Tree … Make Sure to Check for Alerts!
Check this link to read the most current alerts at Joshua Tree National Park. While we were there, we encountered clear skies, rain, sleet, hail, and snow all in one day. It was a brutal storm moving in, but we enjoyed our unique time at the park nonetheless!
Visitor Centers @ Joshua Tree
There are THREE visitor centers in Joshua Tree. While we were there, the Oasis Visitor Center was closed, but we checked out the other two. Joshua Tree Visitor Center is at the main entrance that the majority of people come into from the Los Angeles area. Expect this center to be packed full of clamoring tourists, while the other two are much smaller experiences for those quiet minds.
We checked out this visitor center on the northwestern edge of the park, and it has just about everything. They’ve got a gift shop, plenty of cool exhibits, a cactus garden (albeit sad in the snow,) a coffee shop next door, and friendly park staff. This visitor center is also right next to the town of Joshua Tree – allowing you to make a day trip to explore the unique area if you’re so inclined.
Advertisements
Cottonwood Visitor Center
This visitor center was the first one we went to because of proximity to our campsite but it was well worth it. Of course they have the usual maps, information, and souvenirs but the best part is just around the corner. If you’re going to do any of the visitor centers, don’t miss this one for incredible views of the Cottonwood Spring, a quick walk from the nearby parking area. Here you will see larger-than-life palms, unique flora and fauna, and (if you’re lucky) the spring.
Oasis Visitor Center
This visitor center was closed when we went to the park. I checked online recently and it now says permanently closed … so expect that when you go! Regardless, this visitor center is right next to the Oasis of Mara which we heard is beautiful. Also near this area is Sky’s the Limit which is well worth the visit itself (more on that below).
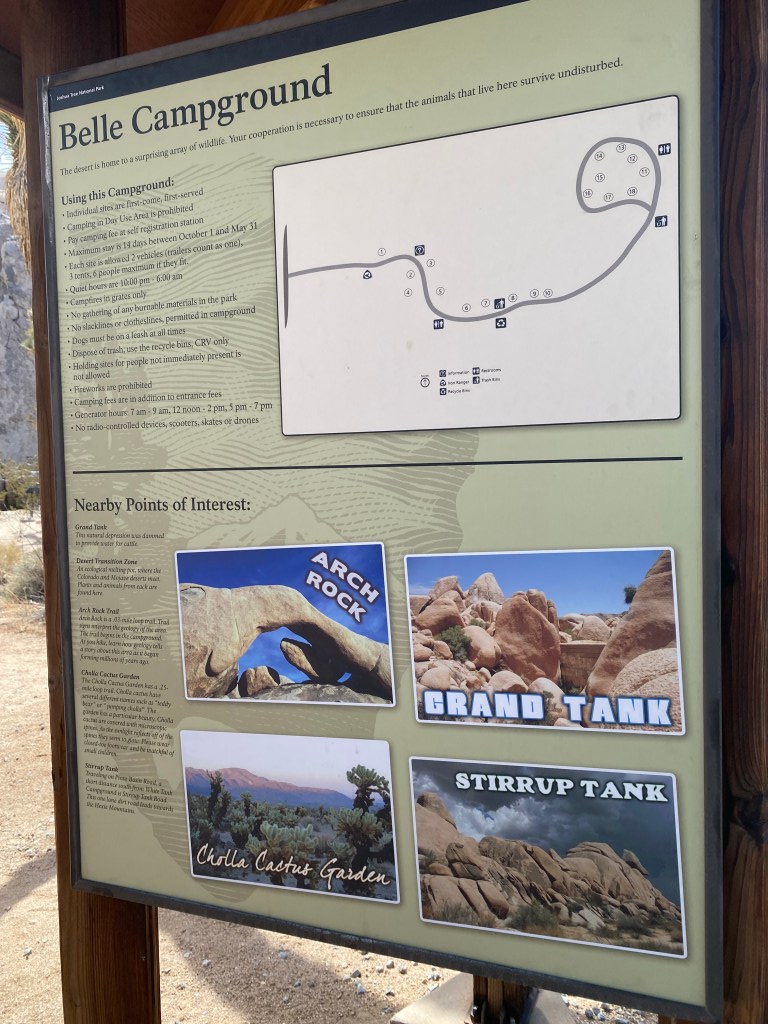
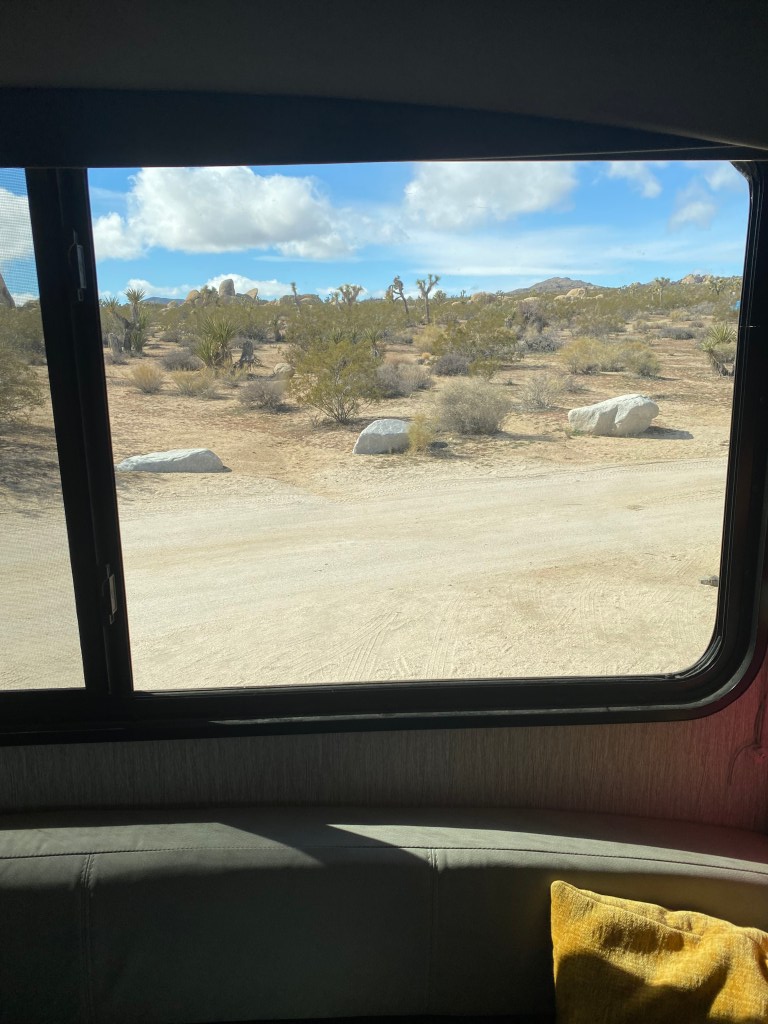
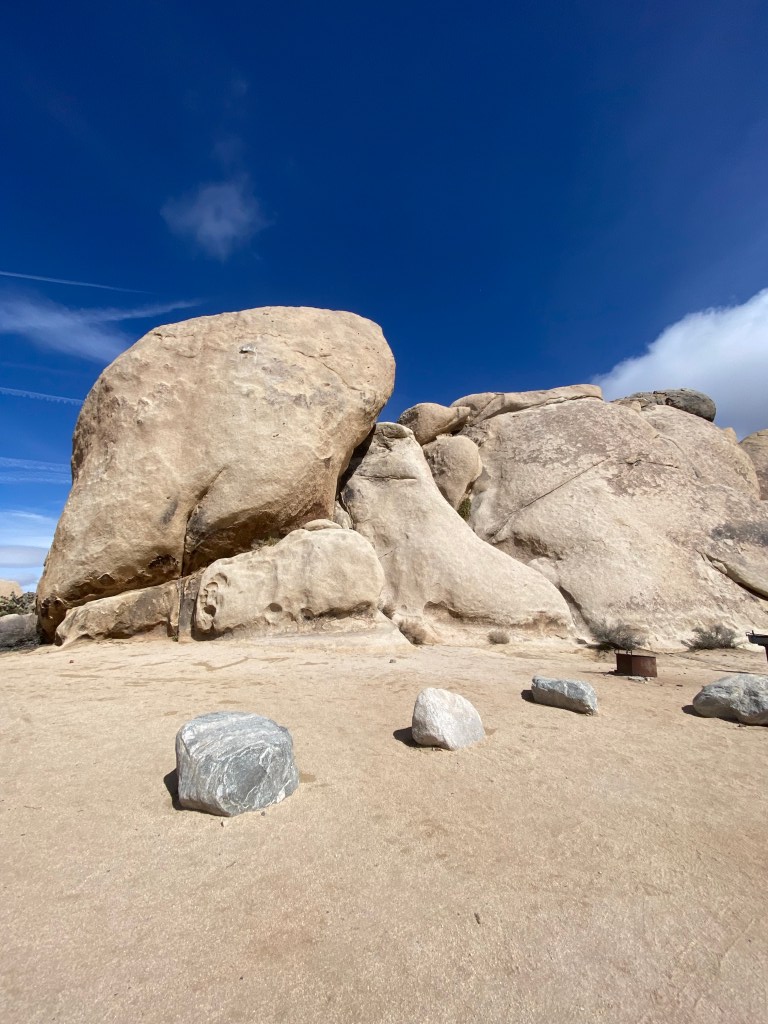
– Our Campsite at Joshua Tree –
Belle Campground, #17
Belle Campground: $15/night dry camping. Pit toilets, tables, and fire grates on site. No water.
This is where we camped out, and you can see plenty of awesome pictures we took just at the campground. We originally wanted to be at Jumbo Rocks campground, but it was booked way out in advance. If your plan is to get one of these first-come, first-serve spots, make sure to get there early (before noon). Especially on the weekends!
Advertisements
– Other Camping Options at Joshua Tree National Park –
Reservations Required Camping:
Black Rock: $25/night, 99 campsites. Water, flush toilets, tables, fire grates, and a dump station.
Cottonwood: $25/night, 62 campsites. Water, flush toilets, tables, fire grates, and a dump station.
Indian Cove: $25/night, 101 campsites. Pit toilets, tables, and fire grates. No water.
Jumbo Rocks: $20/night, 124 campsites. Pit toilets, tables, and fire grates. No water.
Ryan: $20/night, 31 campsites. Pit toilets, tables, and fire grates. No water.
Hidden Valley: $15/night, 44 campsites. Pit toilets, tables, and fire grates. No water.
White Tank: $15/night, 15 campsites. Pit toilets, tables, and fire grates. No water.
Places We Explored in Joshua Tree:
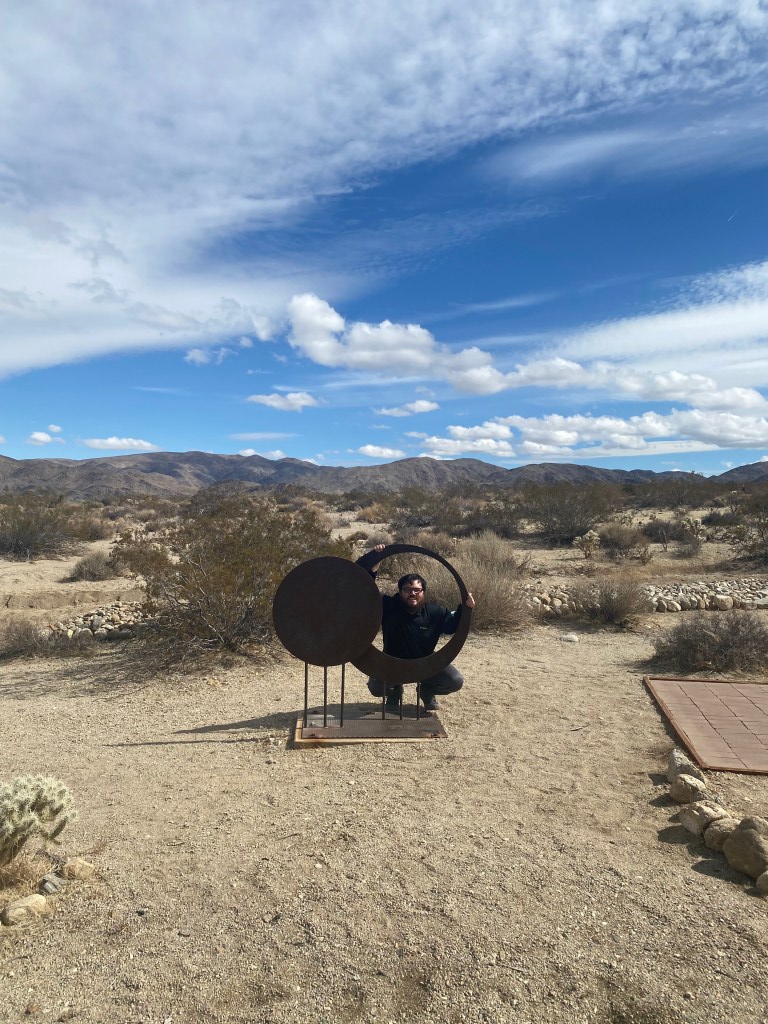
Sky’s the Limit
Sky’s the Limit was a nice little stray out of the way, towards the town of Twenty Nine Palms. Here, they have a meditation garden, sun clock, celestial calendar, stargazing at night, and plenty more to do with a full event calendar. Even when not staffed, we still enjoyed all of the abstract artwork made out of metal modeled after the solar system, planets, & moons.
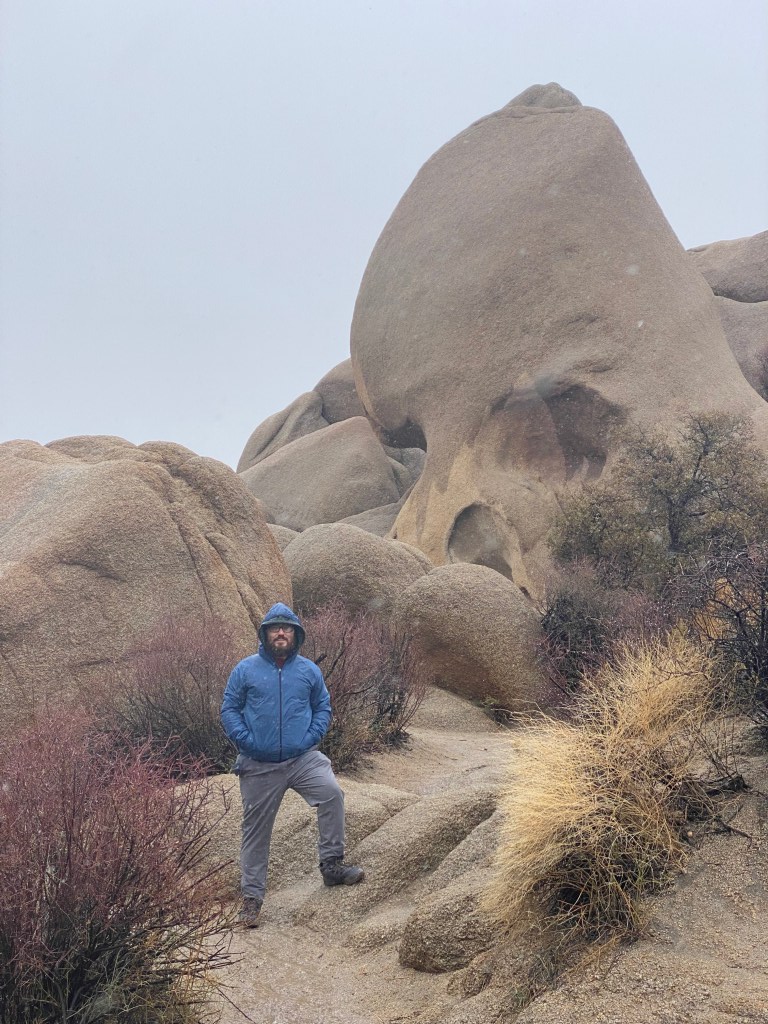
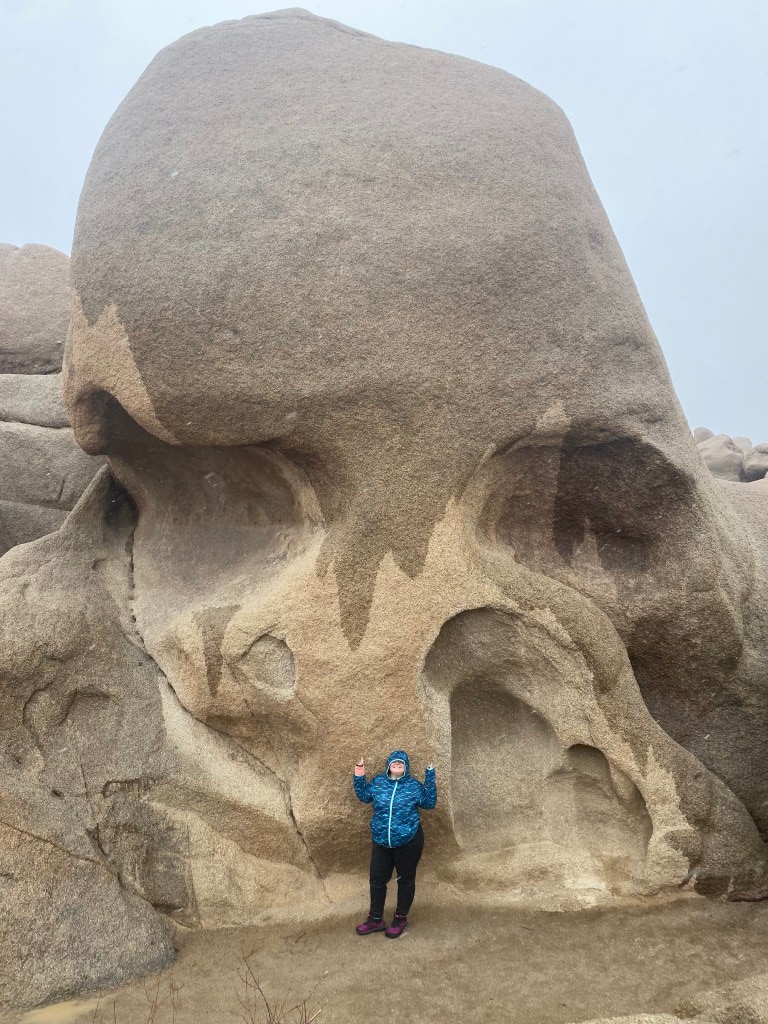
This one looks foreboding and for good reason – it’s literally in the shape of a skull (if you look from the right angle, lol.) It is literally called Skull Rock. As we were walking over to see this incredible rock formation, rain begin to fall. We even began to start to see snow flurries, how much fun!
Parking is on the side of the road right across from this, so very easy to access.
Cap Rock
Advertisements
Cap Rock is another easy walk from the parking lot. It’s pretty cool, because it literally looks like a ball cap on the edge of a rock formation. How long has it been holding onto the edge like that?
Snow started falling as we were sitting in the parking lot here. Our original plan was to head up to Key’s View to have a picnic in our RV there with a great vista all around. But, the rangers shut down the road to Key’s View because of inclement weather, so we pulled off in the nearby Cap Rock parking lot to have lunch with the snow. This detour ended up being a highlight of the day with plenty of fun picture spots.
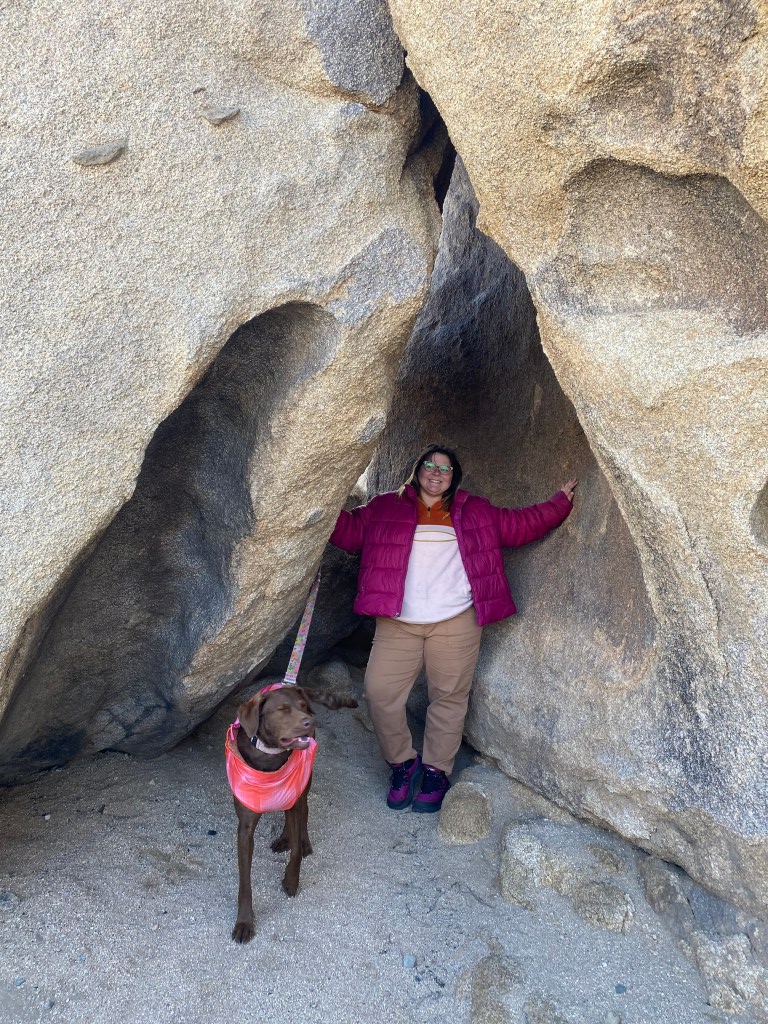
Arch Rock
Narrow passage next to Arch Rock – take this!
Arch Rock looks exactly like that – a natural rock-shaped arch. How incredible is it that nature allows such a beautiful thing to happen?
BONUS: Once you get to Arch Rock, turn to the right. The arch should be on your left now. Keep heading straight through the narrow passages of rocks (top right picture above with a caption). This is an amazing picture-worthy area. If you keep going it turns to the right and there’s even more incredible crevices and rock formations to explore.
Cottonwood Spring
Sorry to disappoint but we didn’t actually get to see a desert oasis spring in the middle of the park. However, there is a spring underground which is indicated by the abnormally large growth of palm trees nearby. This spring feeds a few of the palm trees in this area to keep them growing happy, healthy, tall, and strong.
Advertisements
It’s a great hike to take regardless, and very easy for people of all ages – just a short walk down from the parking area. We ran into a nice elderly couple who had been hiking in the area and had a wonderful chat. Be nice to old people – you never know what you can learn!
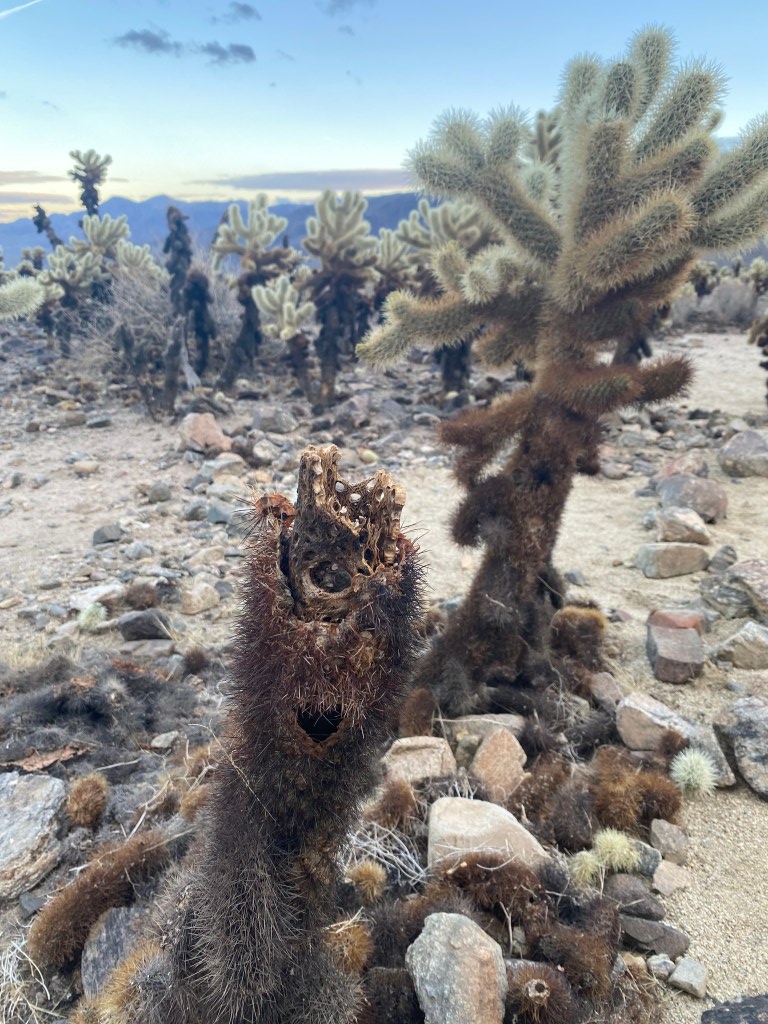
These little cactus guys are something fierce. They can grow taller than people, and when in bloom, have an incredible looking flower. Not to mention that they are super cool and hollow on the inside. Make sure you don’t miss this area when at the park because it is well worth the time. It’s such a beautiful spot with thousands of Cholla cacti situated right off the parking area. The park service has made a walking path that feels like a labyrinth that allows you to get up close. Not too close though! These guys are SHARP.
While we were there, these weren’t in bloom. It’s said that they bloom 2-3 times roughly per year. When they do bloom, they become green, luscious, and even bear flowers. Obviously the pictures we have here tell a different story – not one of thriving and blooms. We saw a few that were starting their regrowth cycle, but I think we must have been too early in the season to see their full potential.
The full bloom of these magnificent cacti-trees. Quite something rare indeed.
This popular destination, perched on the crest of the Little San Bernardino Mountains, provides panoramic views of the Coachella Valley and is well worth the 20-minute drive from Park Boulevard down Keys View Road.
The Keys Ranch is the prime example of early settlement in the Joshua Tree National Park area. Bill Keys was the area’s leading character, and his ranch is a symbol of the resourcefulness of early settlers. The ranch is an extensive complex of small frame buildings built between 1910 and Keys’ death in 1964.
The Hidden Valley Nature Trail Trailhead is located just off Park Boulevard. This trailhead provides access to the Hidden Valley Nature Trail, an easy one mile loop through Hidden Valley on a dirt and rock trail. This is a popular hike through a rock-enclosed valley surrounded by unique rock formations. Along the way there are interpretive signs with information on the area. The trail has an average width of three feet and an average grade of 4% with a max grade of 19% and involves climbing both steps and open rock.
Ryan Mountain is a difficult three mile out and back hike with 1,050 feet of elevation in the central part of Joshua Tree National Park. The first section of the trail is relatively flat, but quickly gains in elevation up the mountain. This is one of the most popular hikes as it provides sweeping panoramic views of the park.
The trailhead for Ryan Mountain is located along Park Boulevard between Ryan Campground and Sheep Pass Campground. There is a secondary trailhead for campers at Sheep Pass Campground, but there is no parking available at Sheep Pass for non-campers.
Explore the rocky desert landscape of Joshua Tree on the Barker Dam Trail, an easy 1.1 (1.8 km) loop. Wander through Joshua Tree’s iconic monzogranite boulders, namesake Joshua trees, and past the historic Barker Dam. Visit a rock art site and experience human history from a respectful distance.
Encounter rock climbers, spot wildlife big and small, scramble over boulders, and walk along desert washes. Catch a glimpse of the far-off San Gorgonio Mountain. View the plant life of the Mojave Desert, including Joshua trees, creosote, Mojave yucca, and pinon pines.
Advertisements
This trail is ideal for short visits, families, wildlife enthusiasts, rock art and history enthusiasts, photographers, and novice scramblers.
Today Lost Horse Mill is considered one of the best preserved mills of its kind in a National Park Service unit. Lost Horse is also a popular destination for visitors looking for a moderate hike. The trailhead is located off Keys View Road. The trail, which is a four-mile round-trip, follows the road developed by the Ryans to haul ore and supplies. Mine shafts are dangerous, and historic structures are easily damaged. While the Lost Horse site has been stabilized, it is still not safe to walk on so proceed with caution.
Lost Palms Oasis is located in the southeastern portion of Joshua Tree National Park. This oasis can be reached on a 7.5 mile out and back hike from Cottonwood Spring with 500 feet of elevation gain. The trail is on a mix of rock, dirt, and sandy washes with very little shade and includes a strenuous climb on rocky terrain out of the canyon that the oasis is located in at the far end of the trail. The oasis is located in Lost Palms Canyon where a permanent water source allows fan palms and other plants to thrive, supporting a vibrant desert wildlife community.
Fortynine Palms Oasis is one of Joshua Tree National Park’s desert oases and is open to the public in the fall, winter, and spring. Located in the northern portion of the park, this oasis provides a refuge among the desert mountains. By providing a reliable source of water, this little oasis allows life to thrive in this seemingly harsh environment.
The oasis is reachable by the Fortynine Palms Oasis Trail, a three mile out and back hike with 300 feet elevation gain in each direction. The trail is on compact dirt with an average grade of 8% and max grade of 27%.
This oasis is a sensitive biological area, please follow posted signs and do not enter the oasis as this is a crucial water supply for plant and wildlife.
In the summer, Fortynine Palms Oasis, its trail, and the parking area all close to allow bighorn sheep undisturbed access to surface water. The park is under drought conditions and herds in the area are increasingly reliant on the oasis spring to survive the hot summer months. The closure will remain in place until summer or fall monsoons provide adequate rainfall to increase water availability.
Which Adventure Will You Take in Joshua Tree National Park?
We’ve had a blast writing this blog and hopefully you’ve got some awesome tips for your next trip to Joshua Tree National Park. My girlfriend’s favorite tree is a Joshua Tree – and for good reason. This park is loaded with thousands of them in all directions, and they’re all unique in their own way. Plus, we had the excitement of adventuring the park during a snow day, which is quite an unusual occurrence – like we are!
Advertisements
<img alt="Matt with
Matt with No Place Like Gone
Hey! I’m the man behind the magic – A.K.A. the camera and blog. I’m also a purveyor of craft beer, grill master, and chief RV driver.
So you just got yourself a brand new (or new to you) RV and want to start exploring the world. Or maybe, you just grabbed a cheap tent and some cases of beer with your friends at the local Wal-Mart. Either way, you’ve come to the right place! We’ve got a guide to help you out with all of the different types of campgrounds.
There are plenty of options for camping that range from roughing it in the middle of the woods, to resort and glamping experiences. Prices and amenities vary heavily depending on where you stay, and you can easily overpay. In this blog we’re going to go over camping options for every budget and also tips & tricks for saving big.
Estimated time to read:
8–12 minutes
Have any questions about the nomadic lifestyle? Message us on any social media platform below:
If you like what you read today, make sure to consider joining the [gone] community. We’ll provide you with the newest updates to travel, minimalism, van life, and much, much more. (And don’t worry – we won’t send you any spam.)
Advertisements
State Park Campgrounds
According to a study in 2009, there are over 6,600 state parks within the United States. These parks sprawl over a total of 14 million acres of land. State Parks are fairly common across the US and are VERY popular during the spring & summer months. I’ve seen typical rates for dry-tent camping sites ranging from $15-$25/night and RV/hookup sites ranging from $30-$50/night.
State Parks highlight beautiful & ecologically significant locations – they typically include bodies of water and trails sprawling through the local topography. Prepare for a great time in the woods with any of these campgrounds. Spots are typically spacious with a few trees in between you and our neighbors. Another trade mark of the State Park system is the eclectic on-site camping stores. Here you can grab stickers and t-shirts to say that you’ve been there and any essentials you may have forgotten last minute for your weekend in the great outdoors!
Keep in mind, not all State Parks offer camping. Some of them are just day-use, meaning you can have a picnic there, hike trails, swim in the lake, etc. but are expected to leave the park right before dark. Rhyming will definitely be my fall-back job one day if this doesn’t work out. What do you think about me rapping about campgrounds?
Advertisements
National Park Campgrounds
There are 423 National Parks in the United States says the National Park Foundation. These are your big hitters. When you think of iconic spots for nature and camping, you think of places like the Grand Canyon, and Yellowstone National Park. These are premier destinations that people travel to from all over the world to see.
Typically, these are near IMPOSSIBLE to get a camping reservation for, unless you are an extreme planner who is ready to book a year in advance – or more. These campgrounds are usually remote and don’t include hookups, or even cell service in many cases. But being in proximity to some of the most beautiful places in the world is well worth the lack of traditional amenities. If you have the chance to snag a spot at any of our National Parks – take it!
Advertisements
COE’s (Army Core of Engineers)
In our opinion, these campgrounds are some of the best, at least for how we like to camp. They usually have plenty of sites available at these campgrounds, ranging between 100-250 sites each. Often a portion of these spots are primitive (meaning no electricity, water, or sewer hook ups.) These are your cheap options to tent camp or boondock with your camper, typically ranging from $15-$25 per night to stay.
The other portion of these sites are for campers and RVs. These are usually electricity only, but they do a great job of positioning water fill-up and sewer dump stations near the entrance of the campground for camper use. These sites are usually between $20-30 per night making these some of the cheapest options to have access to electricity, water, and a dump station while you are enjoying the great outdoors. We’ve stayed for as cheap as $18/night at a COE with electricity.
Another great benefit of COE’s is that they are typically located on a large body of water like a lake or river where you can swim, kayak, or fish. These parks are very well thought out by Army engineers. They also offer shower houses and kid’s playgrounds in most cases.
Advertisements
KOA’s (Kampground’s of America)
KOA sign – You can’t miss it!Activities and more!Cabins are available.Trademark KOA fun – this is what they are known for!
When it comes to KOAs, these are located all over the place. There’s about 480 of them spread across the United States and a few in Canada as well. See the comprehensive list of KOAs here if you want to plan your next family camping trip at a KOA.
They have done a great job of placing KOAs near a lot of the major travel destinations. Places like beaches, National Parks, and mountain ranges will typically have a KOA within driving distance. It’s hard to miss one of these kampgrounds with their highlighter yellow signs on the road. In our experience, it’s pretty costly to stay here. We’ve seen prices around $60-$100/night to stay here. KOAs typically offer amenities such as wifi, full hook ups, a pool to swim in, and dog parks. If that wasn’t enough – they’re espeically geared towards children and will include host activities, theme nights, and kid zones too.
Advertisements
Private Campgrounds
You can find GREAT private campgrounds all over the place. These aren’t affiliated with the parks system or government (city, state, etc.) in any way. They’re basically like you or I opening up our own campground and making our own rules and campsites how we like them.
A great example here is Hollywood RV Park which is where we recently stayed right outside of LA in Hollywood, California. It’s a super cool place that actually houses many film makers and production set workers for nearby film studios. It’s about $90/night in a place like this – mostly because of the prime location in one of the hottest real estate markets in the world – Los Angeles County.
Advertisements
These private campgrounds can range all the way from $25/night hole-in-the-wall type of experience, all the way up to $150/night for your more premium look and locations. Sometimes, they even include things on site like yoga, church services, community events, art classes, or concerts.
Resort “Glamping” Campgrounds
Typically, “resort” or “motor-coach clubs” campgrounds revere themselves for being top notch. Sometimes, they only allow RVs or campers in their park that are models within the last 10 years (2013-2023), or may dictate the type of RVs welcome, to keep up with curb appeal. You will definitely be paying a pretty penny for these – let’s say $90+ and easily into $120/night. These are going to have the most amenities and activities and offer a resort-like experience.
Let me share a little secret with you. If you ever end up in Myrtle Beach, South Carolina, then one of the best kept secrets is Ocean Lakes RV Resort. It’s incredible – and well worth the price of admission. Book early, because they generally fill up incredibly fast – months in advance.
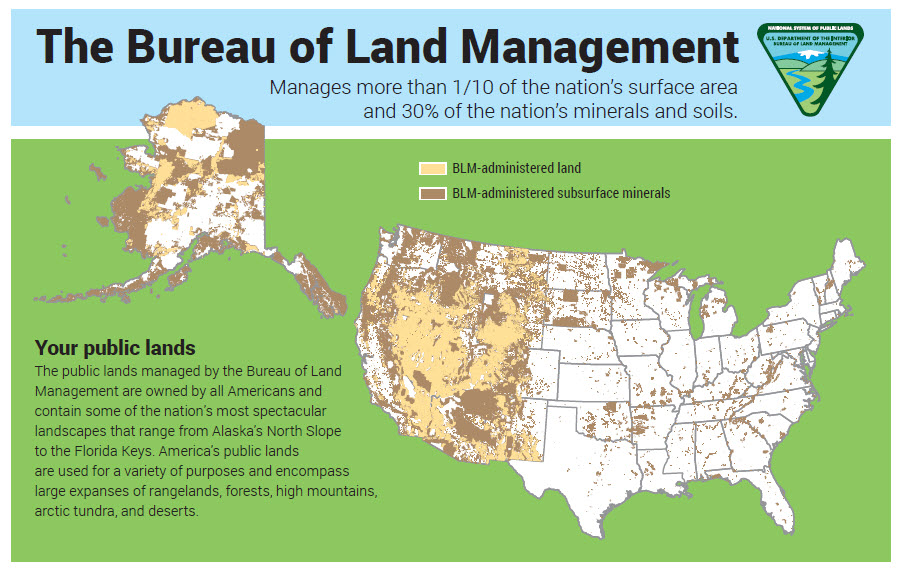
Boondocking (BLM Land)
BLM (Bureau of Land Management) land is for staying over night with NO hook-ups. This land is actually provided by the government, for very small fees, to be used for camping off-grid or in the wilderness. Basically, if you want to get the hell out of society – you can grab a camper and have a blast in the great outdoors. These are most common out west, but can be found across the country.
BLM map provided by the Bureau of Land Management.
Advertisements
A great resource to use for this is FreeRoam, it’s an app and also website that you can download on the App Store. With this, you’ll be able to pop up a map for finding the nearest off-grid land for you to rough it out in.
Harvest Host (+ Boondockers Welcome)
Harvest Hosts:An RV membership program that allows self-contained travelers to overnight at unique locations around the country including farms, wineries, museums, breweries, and more! With 4773+ of host locations inside of the ever-expanding network, there’s an amazing experience waiting for everyone.
Boondockers Welcome: Enjoy truly unique stay experiences often without any sacrifice to comfort as 70% of Boondockers Welcome hosts offer hookups. Escape the crowded and noisy campground in favor of a private spot on beautiful property and a meaningful connection with a friendly host.
We have a great partnership right now with Harvest Hosts and also Boondockers Welcome. We can save you 15% right now on EITHER subscription. They’re normally $100/year for each of them individually, but we can get you down to about $80/year. Make sure to click the green text above to get the discount! Important: You may have to use code BWFRIENDS15 at checkout for Boondockers Welcome to work!
Advertisements
Military Campground/Army Camps/AFB
These are generally a cheaper place to stay, although you often have to be affiliated with the U.S. military in some fashion. These generally are your “on-site” living for most of the military branches: Army camps, Air Force Bases, etc. If you’ve heard of a family living on base in an RV with the member of their family that’s serving, that’s what this is.
You’ll typically see rates near $20-$25/night which is VERY inexpensive per night for full hook-ups and amenities. You can check with the local base campground if you can stay there not being military, but generally it’s for military and government personnel only.
Not Campgrounds – Wal-mart, Cracker Barrel
Oh, the glorious Wal-mart and Cracker Barrel. If you have ever heard of people living in a RV, you’ve probably heard of these two being common places to stay. We have stayed at a Wal-mart, but unfortunately not a Cracker Barrel – yet. If you are trying to save money and have a lower cost of living, than these are your best bets for the occasional stay.
Advertisements
Make sure that you ask the local Wal-mart or Cracker Barrel managers if they are OK with you staying overnight. Sometimes, they will not allow this and may even have signs posted in the parking lots about no overnight stays. You probably don’t want to get that knock on your door by the police in the middle of the night!
Campground Costs Breakdown and Averages:
Types of Campground
Average Price ($/night)
Notes
State Park
$35
Generally hard to get into without 2-3 months out reservation
National Park
$40
Sometimes takes 6 months – 1 year in advance to reserve
COE (Core of Engineers)
$20
Easy to land a spot often
KOA (Kampgrounds of America)
$70
Somewhat easy to get into
Private Campgrounds
$60
Plenty of availability as there are so many options and price points!
Resort Campgrounds
$90
All of the luxuries you would expect at most hotels nowadays
Boondocking (BLM land)
$50/monthly
Small fee to use them, no hook-ups
Harvest Hosts and Boondockers Welcome
Yearly subscription
Harvest Hosts and Boondockers Welcome are separately $80/year
Military Campgrounds/Army Camps/AFB
$30
Generally have to be in the military or branch that the campground belongs to
Other (Walmart, Cracker Barrel, etc.)
FREE
Sketchy at times, be safe out there!
This chart shows different type of campgrounds costs and descriptions.
Thanks for reading! As they say in French, au revoir!
Advertisements
Now that you’ve finished this great read, I ask kindly that you follow us on Instagram so you can keep in the loop of our travels! You never know, we may be the inspiration you need for your next destination 😉
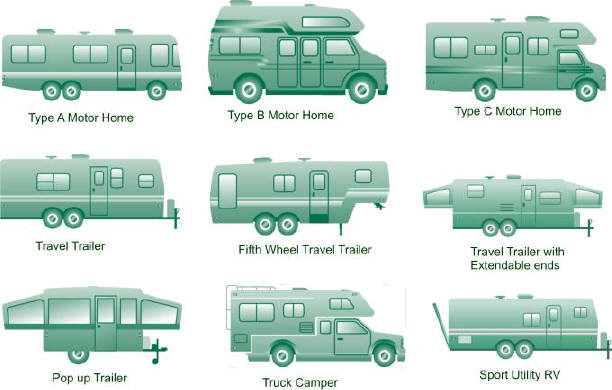
There’s A LOT of options on the market for camping. You can get as simple as a tent, but if you aren’t a purist then you probably aren’t tent camping very often. For the rest of us, your options are typically between truck camper, travel trailer, fifth wheel, camper-van, motorhome, or a self-made conversion. Warning: If you’ve never RV camped before, you’ll be shocked by how small these are compared to the average home of today. Fair warning!
The different types of RVs (recreational vehicles)
We’re No Place Like Gone and we’ve been full-time living and traveling in our Class C motorhome for 9 months now, nice to meet ya! We’ve driven from the East coast to the West coast during our trip so far and have got to see 15 different states along the way! We are currently camping in the country of California. (That’s a joke – because California is HUGE and it’s literally named the Republic of California.)
Here’s the most common variety of campers and the likes:
Truck CamperTravel TrailerFifth-WheelCamper-vanMotorhome – this is us!
Advertisements
Are You Ready to Hit the Road?
Before ya do, follow us on social media so that you don’t miss our next adventure. We post camping advice, hiking trails, nature photography, and stories from our travels, click below:
Earthroamer SX – build shown is close to $1,045,000 (yes, $1 MILLION)
Starting off with a beauty, Earthroamer is in the upper echelon of truck campers. Priced as a luxury vehicle, they are self-contained and include all of the necessities that you need, while also including all of the things that you want. If you’re looking to go off-roading in style, while doing it self-sufficient and off-grid, this bad boy is for you.
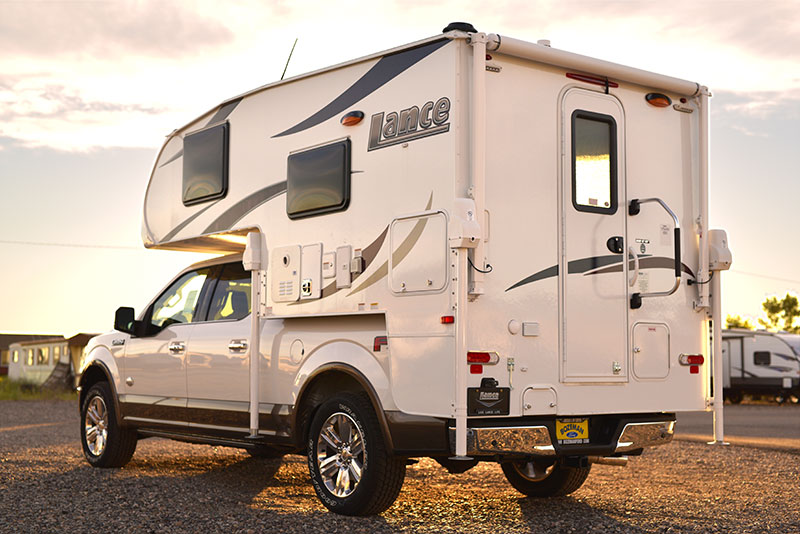
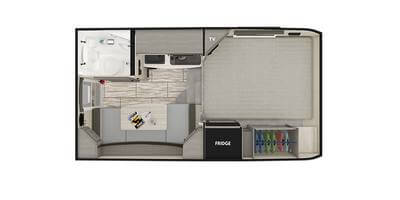
Lance 650 mounted on short-bed FordLance 650 interiorLance 650 floorplan – dinette, toilet/shower, fridge, range, sink, closet, TV, bedroom and more in a small package!
Advertisements
Lance truck campers are at a great price point, starting as low as $25,000 brand new. They’re available for Chevy/Dodge/Ford/GM trucks whether they’re short or long-beds. They have them for select Toyotas and Nissans as well. You get the modern luxuries in a very small package, that is still just an extension of your truck.
There are PLENTY of other truck campers on the market, for every size and shape of truck. We’ve even seen plenty of people that have custom built their truck camper, if you’re a handy type of person. You do sacrifice quite a bit of space over the likes of campers and motorhomes, so I’d recommend truck campers for 1-2 people and rarely more. There’s also options of truck campers with 1,2,3 slide-outs that help gain A LOT of space and storage for these. Expect to spend a little more money on these larger-sized $50,000-$100,000.
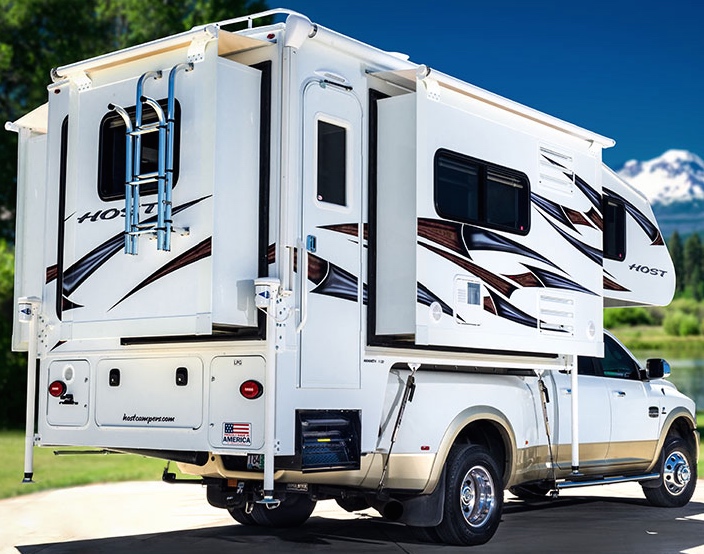
3 slide-outs (sofa, dinette, kitchen)Loki BasecampHost triple slide-out with plenty of space on larger trucks
Pros: If you already own a truck, you just need to buy the camper portion to get started. For recreational campers, you can easily detach the truck camper and leave it at home while you still commute to work like normal. Truck campers detach and can be self-contained on most surfaces, just like any other camper. This makes your truck still usable if you want to leave the camper portion behind and go explore. Otherwise, it’s small and easy enough to drive with for any adventure. No pesky backing in a trailer or motorhome. No hitching or unhitching required
Cons: Not much storage, plus you sacrifice the truck bed to live in this monster! This is a difficult space to live in full time because of the tiny space and minimal storage.
Travel Trailers
Where do I start with travel trailers … when there’s a MILLION different layouts and options available.
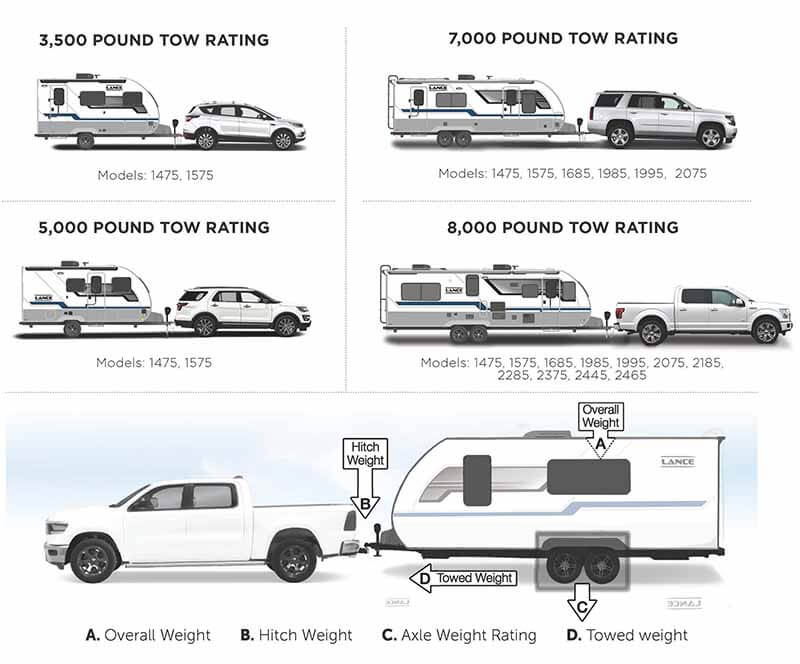
Lance travel trailers with weights and info.Airstream travel trailer size variations
As a beginner, many opt to get the smallest travel trailer – and that’s reasonable. It looks scary to drive a freaking 18-wheeler- length rolling home. Most people will aim to get between a 25 and 35 foot travel trailer, especially if you have kids or any pets. Although, you can definitely exist in a much smaller space if you are willing to be minimal about your camping.
Airstream Classic interiorGrand Design ImagineKeystone hideout, bunk beds for the kids!Old school Shasta (we stayed in one of these)Tab camper – “I just a baby!”Riverside Retro in teal/turquoise
Advertisements
There’s plenty of very, very small options that are well under 20 feet as well, but I know that scares most people away when they actually see how small it is, these are things like Tabs. In this small of a vehicle, you’re sacrificing a lot over your traditional at-home living and I’ll admit that.
We personally accepted that we want a smaller space to save money, and to pair down into a more minimalistic lifestyle. We have a 26 foot Class C motorhome, don’t tow a car, and it’s been a dream for us. Camping, and life in general, really is a “choose your own adventure!”
Pros: You can pretty much pick your dream floor plan, with as many slide-outs and storage as you want. They literally have thousands of options here. Another good thing here is that if you already own a truck or large enough SUV, you’re pretty much ready to buy a trailer and take off!
Cons: If you’ve never driven a big truck or pulled a trailer, then be prepared for a learning curve. Also, backing in a travel trailer is somewhat frustrating for newbies – expect fights with your spouse (LOL). Difficulty of hitching, unhitching, setting up levels and chocks.
Fifth-Wheels
The difference between fifth-wheels and travel trailers are that the fifth wheel hitch mounts within your truck bed, and the space above is generally used for a bed or additional storage. Fifth wheels generally have much larger turn radiuses.
Fifth-wheels are pretty common nowadays, and for great reason. You combine the great size of a Class A motorhome with the ease of use of a travel trailer. Not to mention that you get to also include the space above your truck bed as additional living space, which travel trailers just can’t match. The turning radius on these bad boys is quite large too, much better than your pull-behind campers that can jack-knife (turn too hard and the trailer and hitch will crunch in on itself).
Finding a fifth-wheel for just about every price point is practical, with floor plans to appeal to everyone. Slide-outs here can almost double your living space in some cases.
Advertisements
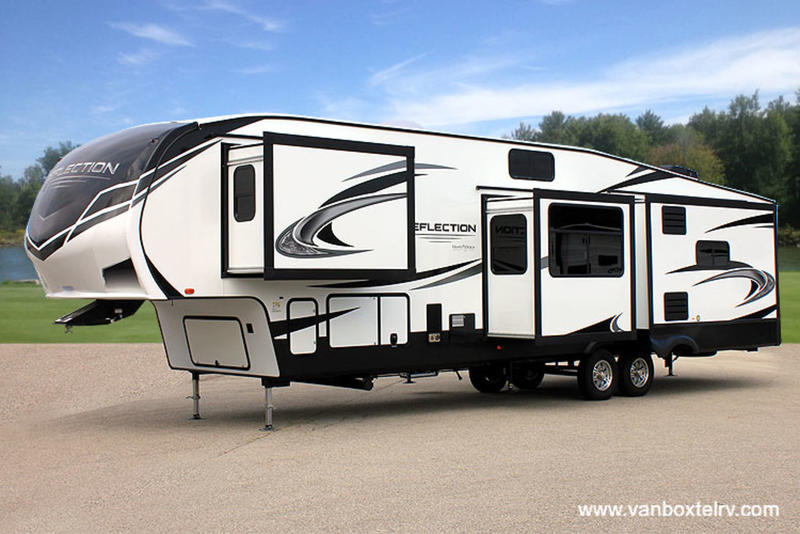
Scamper (small camper)Older fifth-wheel still works great!Grand Design Reflection, a very common fifth-wheel that has it all
Pros: Gain the space over your truck bed as a living quarters, compared to travel trailers losing that. Quite easy to level and balance out once un-hitched from a truck. Can get these as large as a Class A motorhome, basically 45 feet of usable floor plan PLUS slide-outs and storage underneath.
Cons: Price, usually between $50,000-$150,000.Very bulky and usually between 25 and 45 feet. Harder to drive especially for newbies if you’ve never pulled a trailer. Hitching, un-hitching, and setup is more than a smaller travel trailer or motorhome/van. You must have a special hitch to connect to your truck.
Camper-vans
These are sometimes called Class B motorhomes (see below motorhome section), although not always. Sometimes simply called vans, these things are literally a mini-van that you sleep in. You can see the yellow VW below and this thing is beautiful.
1976 Volkswagen Westfalia – man, we’d love to have one of these!
Because of the size of these, you obviously won’t get very much storage space. Not to mention living space, which is basically non-existent. You usually have the front seats to drive, bench seating that converts to a bed (or in the case of the VW you can sleep in the pop-up camper top portion), a mini-fridge, little camping range, and a few cabinets. That’s about the extent of what you get here with vans.
A huge mention here is that these will not typically include a bathroom of shower, some of the most crucial luxuries for many of us. Expect to use the campground showers and toilets!
Lexus camper-topHonda Element interiorDodge PromasterInterior of a Ford Transit campervan
Advertisements
There’s a wide differential in prices of camper-vans, and there really is a different vehicle for everyone. They all vary widely with features, sizes, bed types, and more. If you’re considering one of these, make sure to do your extensive research and expect to pay a pretty penny. You’ll spend between $25,000-$225,000 whether you want a used little Dodge Promaster that’s been partially renovated, or a brand new ready to live in beast like the Winnebago Revel.
Pros: These are as small as your basic SUV or truck that you’re probably driving already. Picture a plumbing or construction work truck, but converted into a living space. Can be 4WD or lifted for plenty of driving clearance.
Cons: Basically zero storage – you’re living in a van, man. These rarely even can fit a shower or toilet. You’ll either have to use the camping bathrooms, or opt for a composting toilet and outdoor shower spray wand.
Composting toilet that slides outdoorsComposting toilet inside a vanOutdoor shower wand for exterior bathing
Advertisements
Motorhomes
Very important to note that this “class” system does not jump from A, to B, to C depending on length or price by any means. In general, Class A motorhomes are the largest and most luxurious or expensive. Class C motorhomes are a budget version of that, and in much smaller form factors. Then, you have Class B motorhomes which are heavily improved camper vans with all of your modern accessories, usually at a smaller package than both Class A and C motorhomes. I know, it’s pretty confusing, but I didn’t create this system!
Class A: The “Crème de la crème” (French, literally means cream of the cream, or translated further to mean cream of the crop, or the best of something) of motorhomes. These bad boys are usually starting at $50,000 for a VERY used model. You can expect to pay close to $250,000 for a decent motorhome here, and easily up to $1 million dollars for some of the top of the line options like Prevost.
Prevost, top of the line of motorhomes. This thing is like close to $1 million brand new.
These Class A motorhomes have all of your luxuries of a modern home, albeit in a much smaller package. They have sprawling living spaces, slide-outs to add additional space, king beds, dual-vanity sinks in the bathroom, and huge residential refrigerators (RV fridges are typically much smaller than a home/residential fridge). Expect to pay quite a pretty few pennies for these though.
Another super important thing to note is that Class A motorhomes can range from the smallest at about 22 feet, all the way up to 45 feet of living space.
Pros: More space than you should ever need. Easy setup: you pull-in, park, use your auto-levelers and hook up power, water, and waste. That’s basically it! You can tow almost any car, truck, or SUV. These things are beasts and way a ton, plus have massive diesel engines capable of pulling just about anything.
Cons: These motorhomes are huge and when you see them out, they’re usually 35-45 feet long. You’re basically driving a school bus with much more weight and features inside. Most engines here are diesel – expect HIGH fuel prices especially in these hard times. Good luck parking this thing anywhere, as its too large to fit in a lot of places.
Advertisements
Class B: These are also lumped into the “camper-van” category quite often. In reality, Class B motorhomes are larger and considerably more upscale over the traditional camper-van. Usually Class B motorhomes have a bathroom and shower, even if they’re tiny and hard to use, where as camper-vans almost always do not. The length of a Class B motorhome caps out at about 22 feet in most cases, so these are typically easy to maneuver and drive anywhere!
Pros: Very small and easy to drive, not much of a difference from your daily commuter. You can park it just about anywhere, standard parking spots are big enough. Most of these vans are available with 4WD making them beasts to go off-roading or onto a beach.
Cons: Very small space, good luck with storage, because you don’t get much. Usually your dining table/dinette converts into your bed. Although, in certain models you can definitely use the front driving seats as your dining space. Vans or Class B motorhomes are VERY expensive … usually starting at $100,000 and exceeding well above that!
Class C: This is where WE fit in! We have a Class C motorhome, and it’s a 2022 Coachmen Crosstrail XL 23XG. Yep, that’s a mouthful – why do they name these things like freaking extraterrestrial planets?
Our dining tableOur baby – 2022 Coachmen Crosstrail XL 23XGSimple bathroom“If I fits, I sits” – words of a cat (but I’m a dog)One happy customer!
Advertisements
Class C motorhomes vary greatly between about 22 feet and 33 feet, and you can’t get much larger than that. Once you step above that threshold, you’re looking at either a travel trailer, fifth wheel camper, or a Class A motorhome because each of these have options to go much larger.
Pros: These offer a nice blend between the Class A and the Class B, which is why I’m baffled why it’s called a Class C. (I guess Class C was the third thing invented by combining the other two?) Budget friendly for the whole family, and Fido!
Cons: These cap out at about 35 feet, so if you want larger you’ll have to get a Class A or travel trailer/fifth-wheel. Very low ground clearance – expect to scrape a lot when driving. Not the most luxurious, if you want that instead: look to Class A or B.
The Others
We’ve seen just about everything on our trip over the last 9 months of full-time RV living. We’ve seen plenty of music festival-goers basically living in their vans and school buses. I spotted a Honda Element with a pop-up rooftop camper once. Plenty of SUVs like Toyota 4Runner, Subaru Outback, and others that people have slapped a rooftop camper top on. We’ve even seen a few people using “Camp mode” on their Tesla as they sleep in it at their campsite pedestal charging overnight.
“Life really is about creating your own adventure.”
-No Place Like Gone, 2023
We’ve Had Fun Today – Did You?
We can only hope that you had a blast reading our blog today. We love camping and traveling full-time so much that we have dedicated our time to help others do the same. It’s truly a lifestyle fit for just about everyone, with many, many options to suite your needs. The experience of camping is how you can live simply, see plenty of beautiful landscapes, and experience the world through your own lens.
Advertisements
<img alt=" Matt with
Matt with No Place Like Gone
Hey! I’m the man behind the magic – AKA the camera and blog. I’m also a purveyor of craft beer, grill master, and chief RV driver. Connect with me on social media below:
This is what we’ve learned on our cross-country roadtrip:
Are you just getting into #vanlife or RV travel? Maybe you just bought your new camper and are ready to hit a nearby campground for the first “shake-down” trip? Or maybe you’ve been camping for a while and you’re seeking ultimate relaxation?
We know camping can be a scary thing … you’re literally deciding to go sleep in the woods and become one with nature. (Bears, coyotes, snakes, and bugs live out here!)
Well, step 1 is to read this blog & learn how to camp like a pro. Step 2 is to unplug from all of your devices so that you can embrace the great outdoors and enjoy your camping trip! Let’s get started.
Advertisements
The Dos and Donts of Staying at a Campground:
Do:
Do make a list before you pack up: If you don’t, you’ll end up forgetting something – and it’s usually something super important. Checking off items on a list helps keep you organized so that you won’t miss any of the important items you’ll need in the woods to survive.
Do say hi: Be sure to say hello to your new neighbors for the weekend (or longer depending on your stay). If you’re an introvert, wave at your neighbors when they look over. If you’re an extrovert, strike up a chat when someone walks by. You never know what you could learn from someone new. Do keep in mind that some people like camping to get out in nature (and away from people) though – don’t be overbearing.
Do act like the neighborhood watch committee: Keep an eye on your neighbor’s stuff, especially if they leave for the day. Most of the time there are no problems, but some campgrounds can be hotspots for thieves. Be sure to lock up bicycles and anything else that can “grow legs” and if you see someone fishy in your neighbor’s spot, report it. You’d want them to do the same for you, right?
Advertisements
Do arrive before sun set: Ideally you’ll arrive right at check-in time and be able to maximum your trip, but at a MINIMUM arrive before the sun goes down. I can’t emphasis enough how important it is to actually be able to see while you setup your campsite. Arriving on time also lets you to enjoy the sunset from your new campground spot. If you arrive after dark, good luck – you will be getting frustrated…
Do share your location: Let your family and friends know where you are staying and your plans for the trip. This is especially important if you expect your phone won’t have signal, you never know what can happen out in the boonies. If you’re in a more developed area tools like Apple’s “Find My” are a great way to share your location with loved ones.
Do make a plan for your pooch: Most campgrounds will allow pets buuuuut, some don’t. Sometimes, you’ll have to pay an extra fee to bring your pup with you or there could be breed restrictions. Pets are not allowed on any trails within a National Park – so be sure to plan accordingly for a safe spot for your pup (DO NOT leave your dog in a hot car). Some campgrounds will even have dog parks on site – just make sure to check the rules beforehand and plan accordingly. Oh – and pick up your pup’s poop!!!
Advertisements
Do observe fire safety warnings: Sometimes, especially out west, there are fire bans in place. These aren’t because they don’t want you enjoying s’mores by the campfire. Bans are because conditions are so dicey that devastating wildfires can begin from just a single hot ember. Decade-long droughts and strong winds create conditions that can spread wildfires in the blink of an eye causing millions of dollars worth of damage and potentially loss of life for animals and humans in the area. If you do have a campfire, pour water on it to put it out, stir with a shovel, and then douse with even more water to completely smother the flames. This is the only, and best, way to make sure the fire won’t reignite and become a problem. Make sure you listen to Smoky the Bear and check local conditions before starting any fire.
Do check the weather: With today’s technology and weather apps available in the palm of your hand – there is no excuse for not knowing if storms are coming through. Check the weather multiple times before your trip and then again each day during your trip. A weather radio can be especially helpful in remote areas. It may seem tedious, but while camping you are especially exposed to the elements without the protection of a sticks-and-bricks home. Keep in mind that large bodies of water like lakes or oceans can make conditions worse. We learned this the hard way while tent camping on a point in Georgia during a hurrican-ado (hurricane-tornado, lol). Conditions can change QUICK, so be alert.
Do pack extra layers: Bring extra clothes, you’ll need them. Temperatures can vary widely between daytime and nighttime – it’s usually colder outside than you realize at night. You’ll also want an extra pair of shoes and socks in case yours get wet (no one wants to hike in wet socks).
Do enjoy the great outdoors: Ultimately, you booked this trip to get outside and experience nature. So, enjoy your time! There may be bad weather or bugs, but if you embrace it all with a smile on your face you’ll have memories to last a life time.
Advertisements
Don’t:
Don’t forget the necessities: There are thousands of gadgets and all types of gear for camping. Those are great, but don’t forget the basics. These are food, water, shelter (tent or camper), and a first aid kit. Making a list before you pack is helpful to ensure you don’t forget a single item.
Don’t bug folks during set up: We encourage you to say hi to your neighbors. But pleaaaaseeee don’t smother a fellow camper the second they pull in – no matter how cool their rig is. After a long drive, people need time to settle in and set up – give them time and space. After they’ve set up their temporary home, let the friend-making begin.
Don’t be the campground DJ: Blasting music assuming the whole campground wants to party is a no-no. Your site is your space & your music shouldn’t be audible beyond it. Keep in mind that your fellow campers may have small children, or consider your music offensive. A lot of people camp to enjoy the peace and quiet of nature – not Miley Cyrus’ newest hit blaring through your bluetooth speaker.
Don’t let your dog be a nuisance to others: We’ve yet to see an off leash campground – campgrounds require your pet to be leashed or confined to your space. This is for their safety and yours.
Advertisements
Don’t keep everyone up: If it’s past quiet hours – be quiet. Quiet hours usually begin after 10pm at most campgrounds and end around 7am – be sure to review your check-in paperwork for specific instructions. This includes generators, kids, dogs, and anything else that emits sound.
Don’t be trashy: Use the dumpsters and recycling bins provided by the campground. Don’t leave trash all over your campsite, or overnight where animals may get into it. Nature isn’t a trash can for our garbage – we have to preserve its beauty so that we can continue to enjoy it.
Don’t feed the natives: While they may be fuzzy and cute – wild animals are meant to be just that – wild. Don’t feed any wild animals and don’t leave food out where animals can get into it either. Be on high alert in areas that bears frequent. You can usually tell if there’s been a problem with animals searching for food if there are heavy-duty-bear-proof trash cans or locking food boxes on site.
Advertisements
Don’t leave your awning out overnightorwhen you’re away: Very often, strong winds or rain can come in unexpectedly (which is why we recommend you check the weather often). Your RV awning or stand alone pop-up canopy cannot withstand winds over roughly 20 mph (miles per hour). We also learned this lesson the hard way when our 10 foot x 10 foot tailgate canopy crumbled in the Colorado desert during a sandstorm that blew in randomly in the middle of the day with 50-60 mph winds.
Don’t cut through spots: Use marked pathways to get around the campground and be sure to keep an eye on kids playing. They may unintentionally run through your neighbor’s spot and get the “Hey you stinking kids – get off my lawn!!!” talk.
Don’t burn firewood from another location: Typically, the rule is don’t bring firewood from further than 50 miles away from the campground you are staying at. The reason for this is that you may unintentionally introduce new harmful species of bugs or plants that aren’t native to the area. This can severely hurt the wildlife and ecosystem of the new area you’ve brought the wrong wood to.
Don’t camp alone: Camping is always better (and safer) with friends – the more the merrier! With the right prep work, solo camping can be a restorative time in nature but we recommend always having a buddy with you. Be sure to bring camping buddies with you to enjoy the great outdoors safely; you may even help your friends discover a new hobby in the process. At the very least, make an Instagram post after your trip to share your adventure and the things you discovered during your time outside to get your followers curious about the great outdoors. Sharing is caring!
Advertisements
What Did You Learn From This Blog?
We’d love to hear your feedback. What did we miss? What are some of your campground do’s and dont’s? We are always looking to improve our quality of content so that we can help newbies and veterans of camping alike.
Join the [gone] community for more blogs about traveling the US, camping tips and tricks, and travel hacks.
Get plugged in with us by clicking the links below:
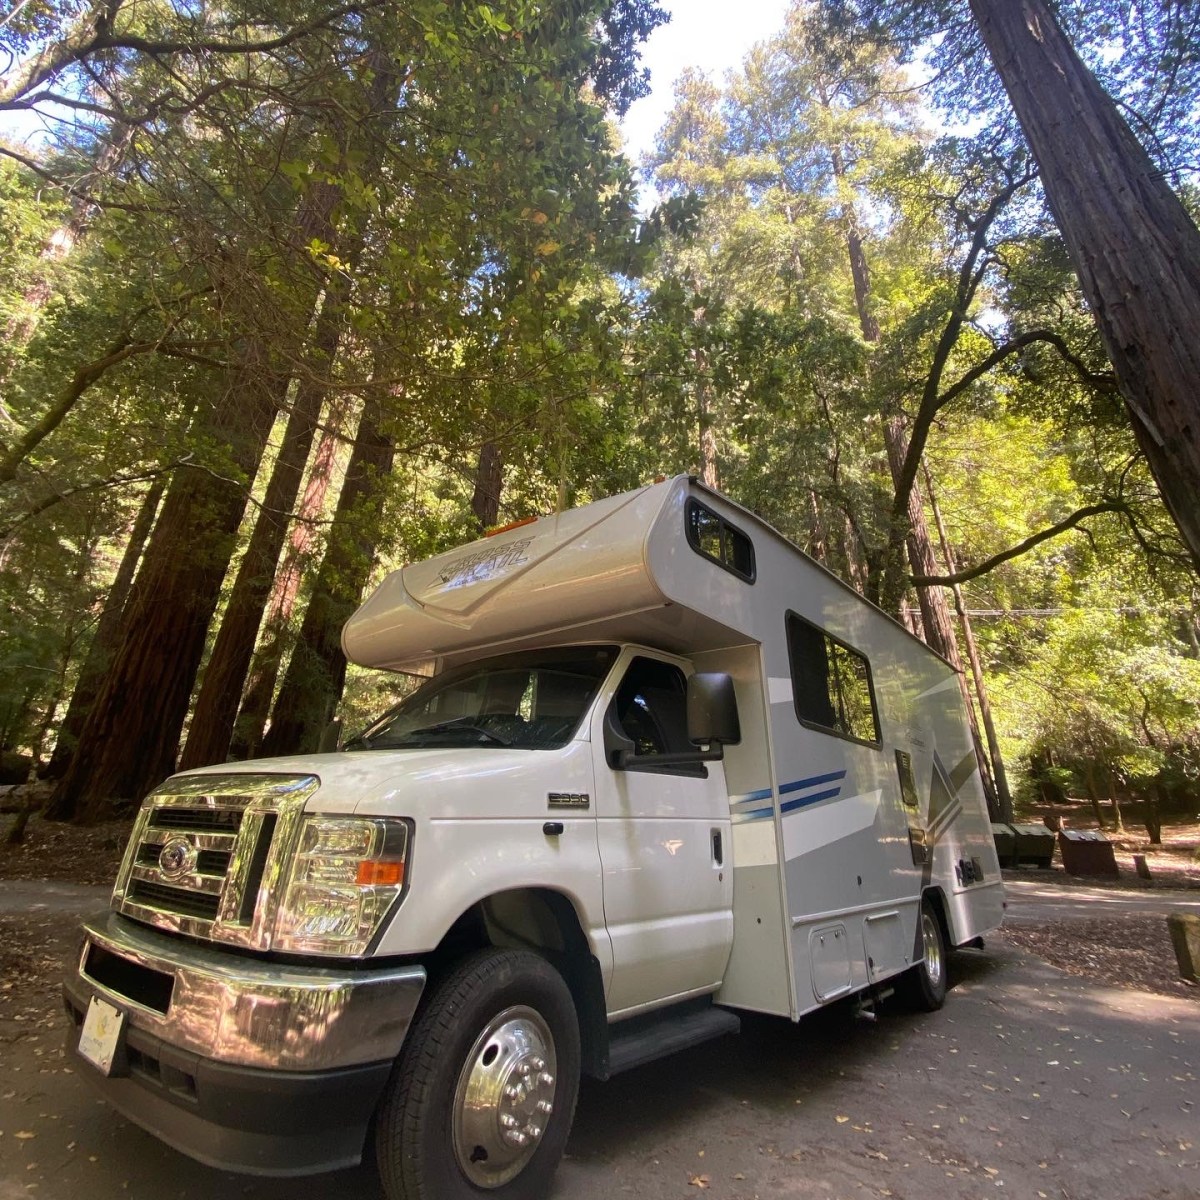


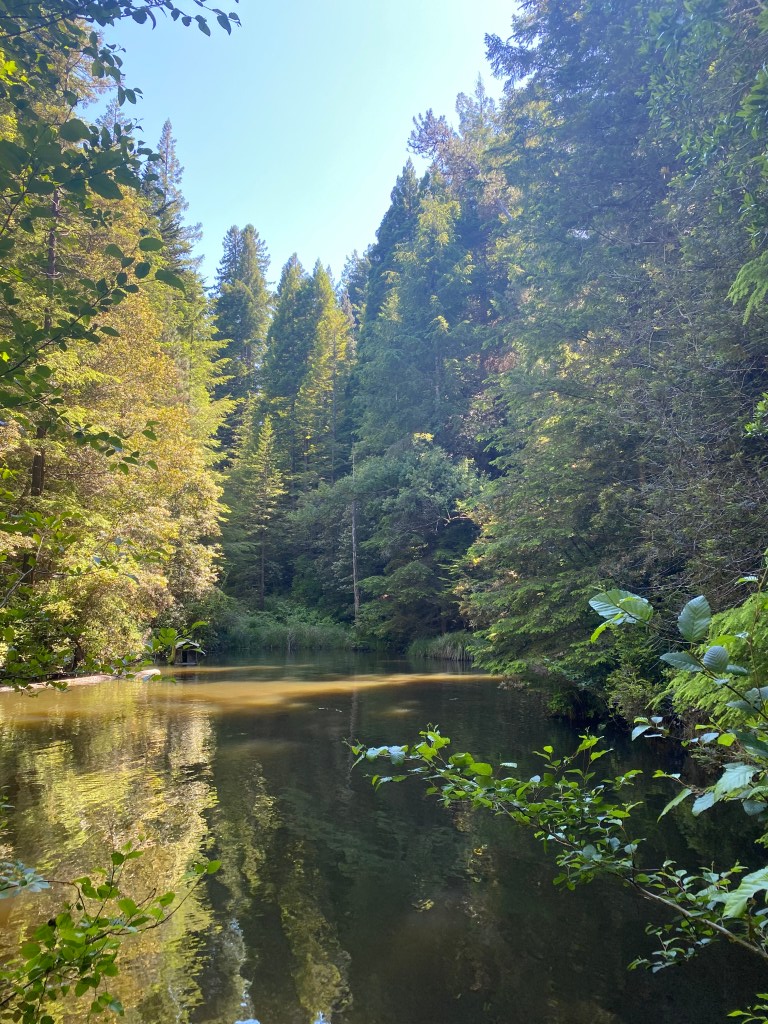


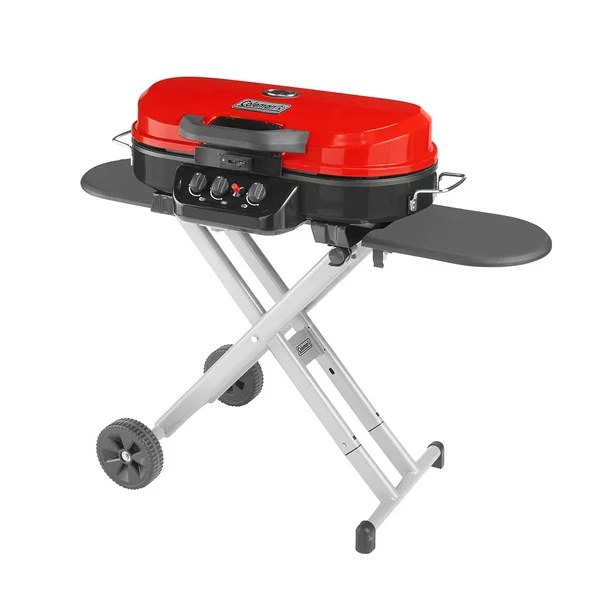


![What’s Your [Camping] Type?](https://noplacelikegone.com/wp-content/uploads/2023/12/cac39-rvs-explained.jpeg?w=580)